So, you have been feeding your starter every day for the last five days. Good for you! But you don’t have to feed it every day. Here’s how I keep my starter.
You will need:
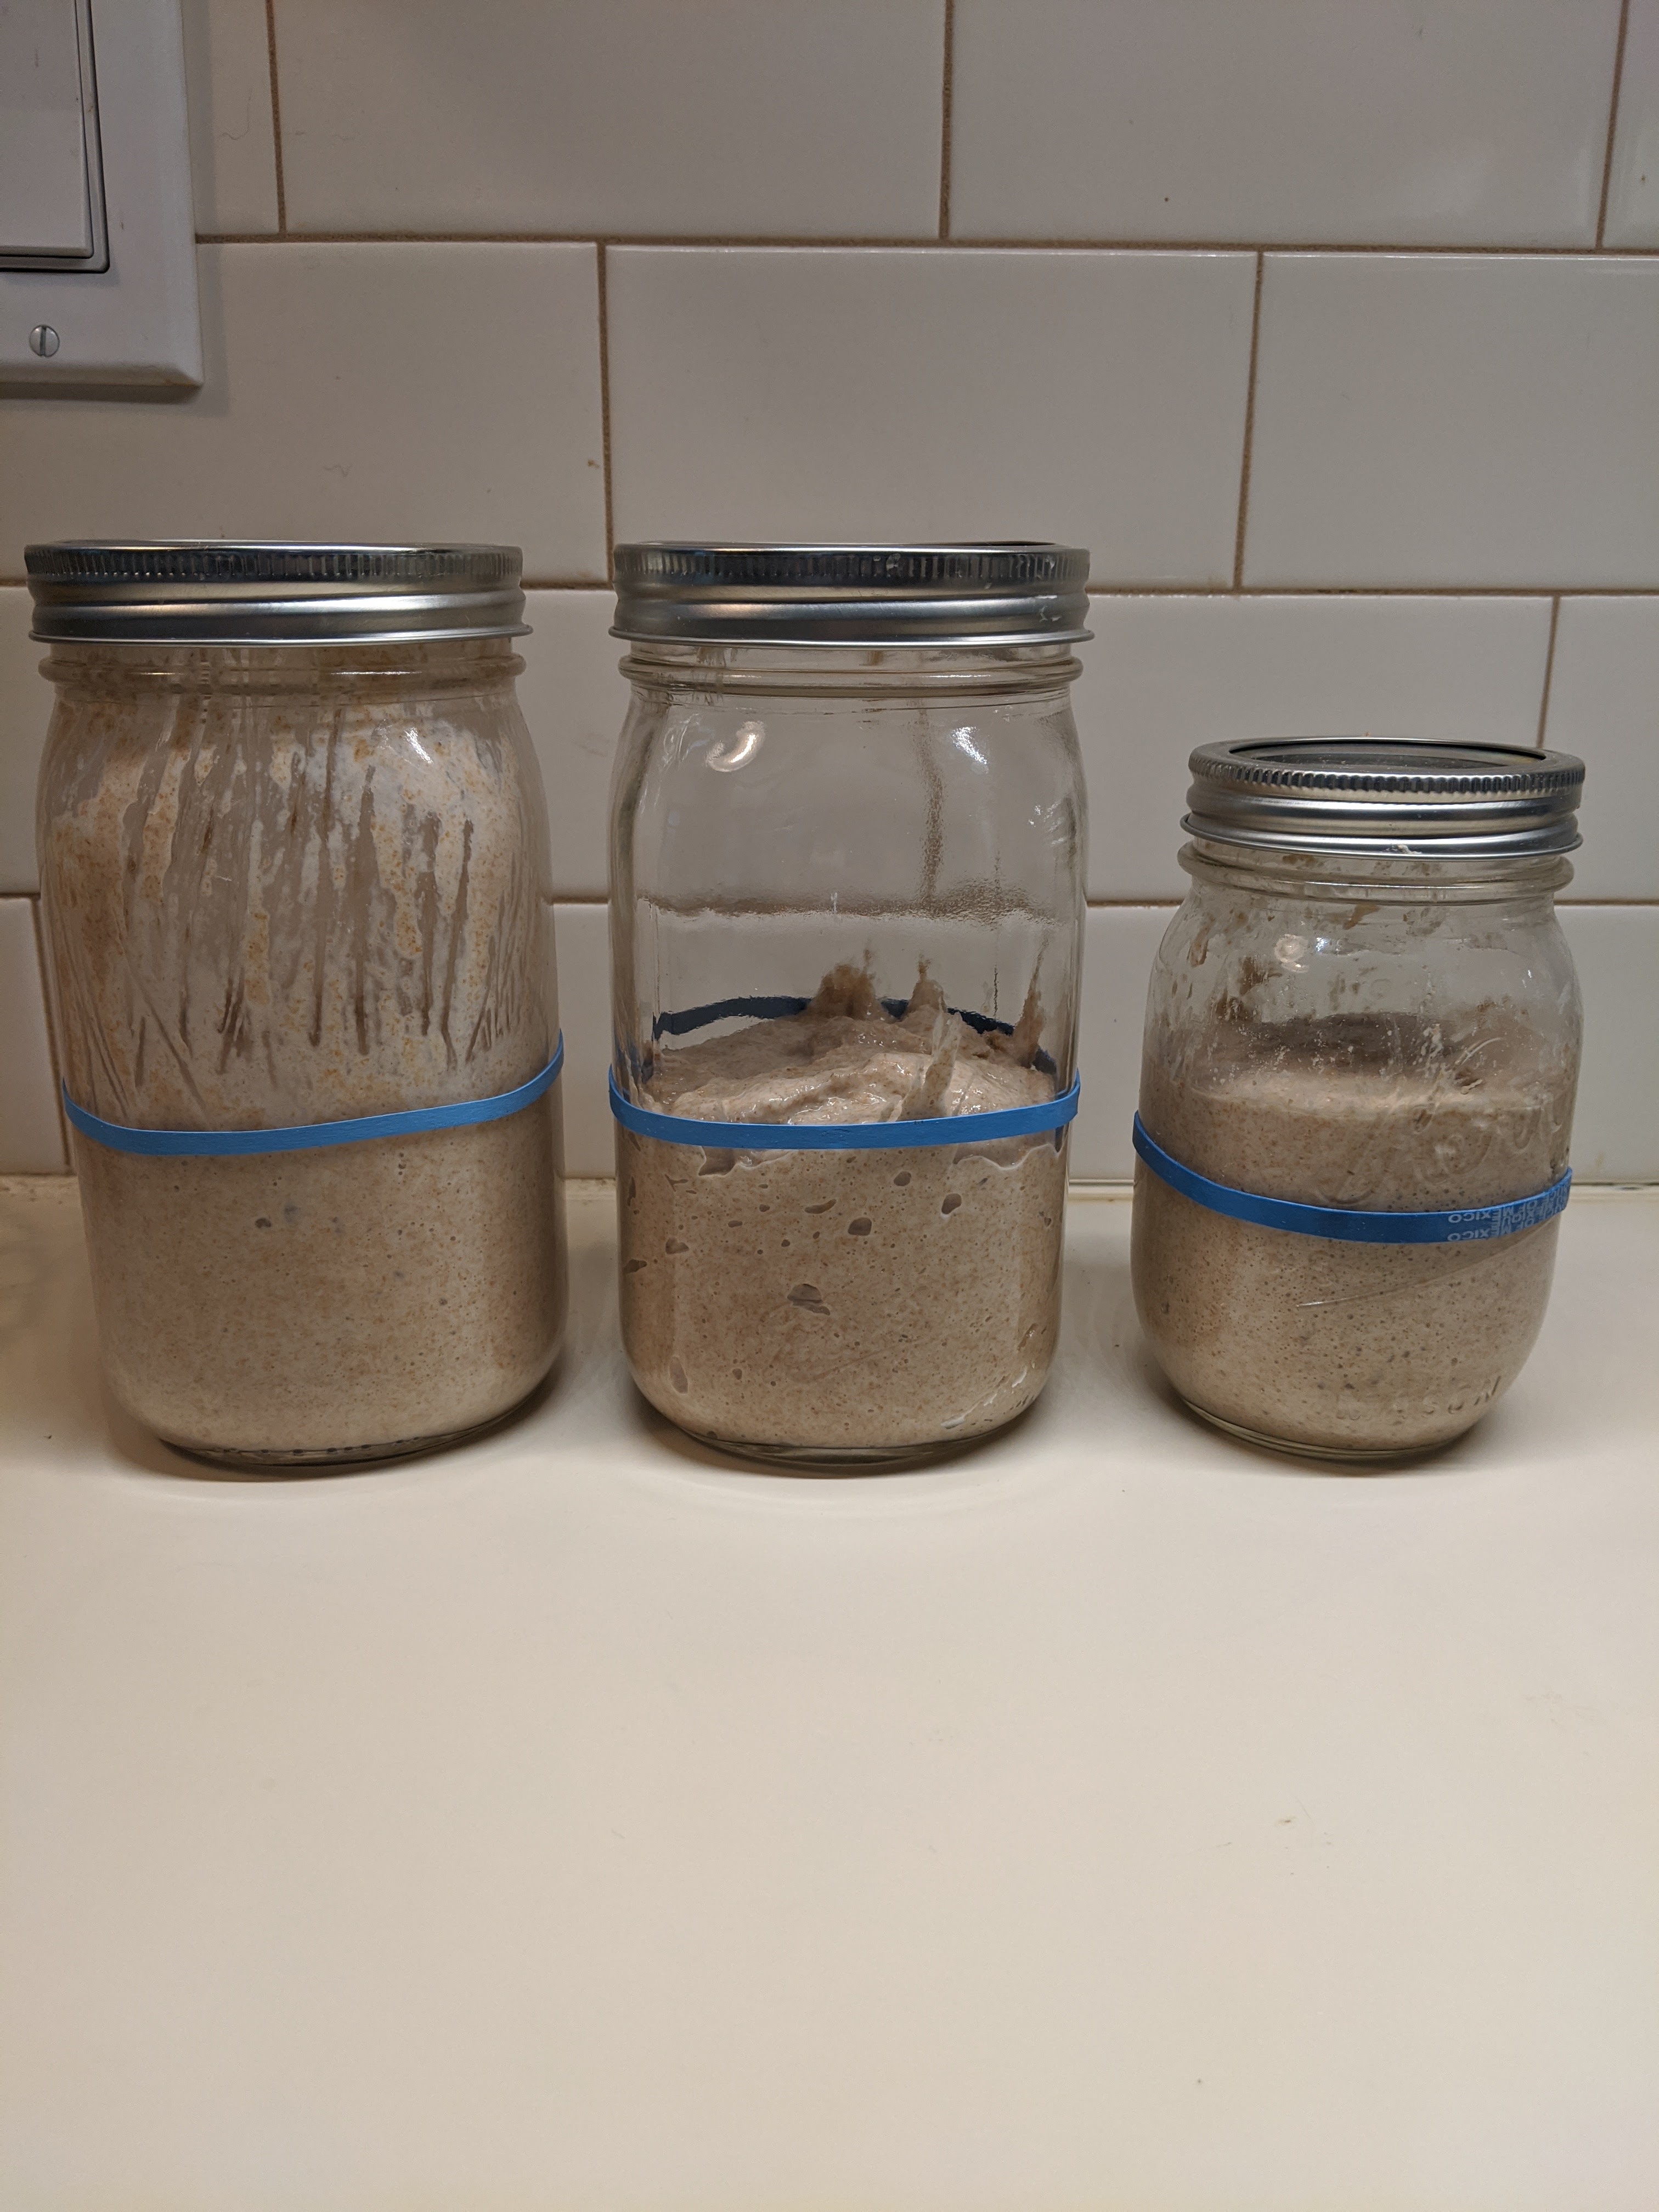
Your starter (called the Mother)
Clean wide-mouth pint jar with a lid
Your trusty chopstick
Filtered water and Whole Wheat Flour
Rubber band
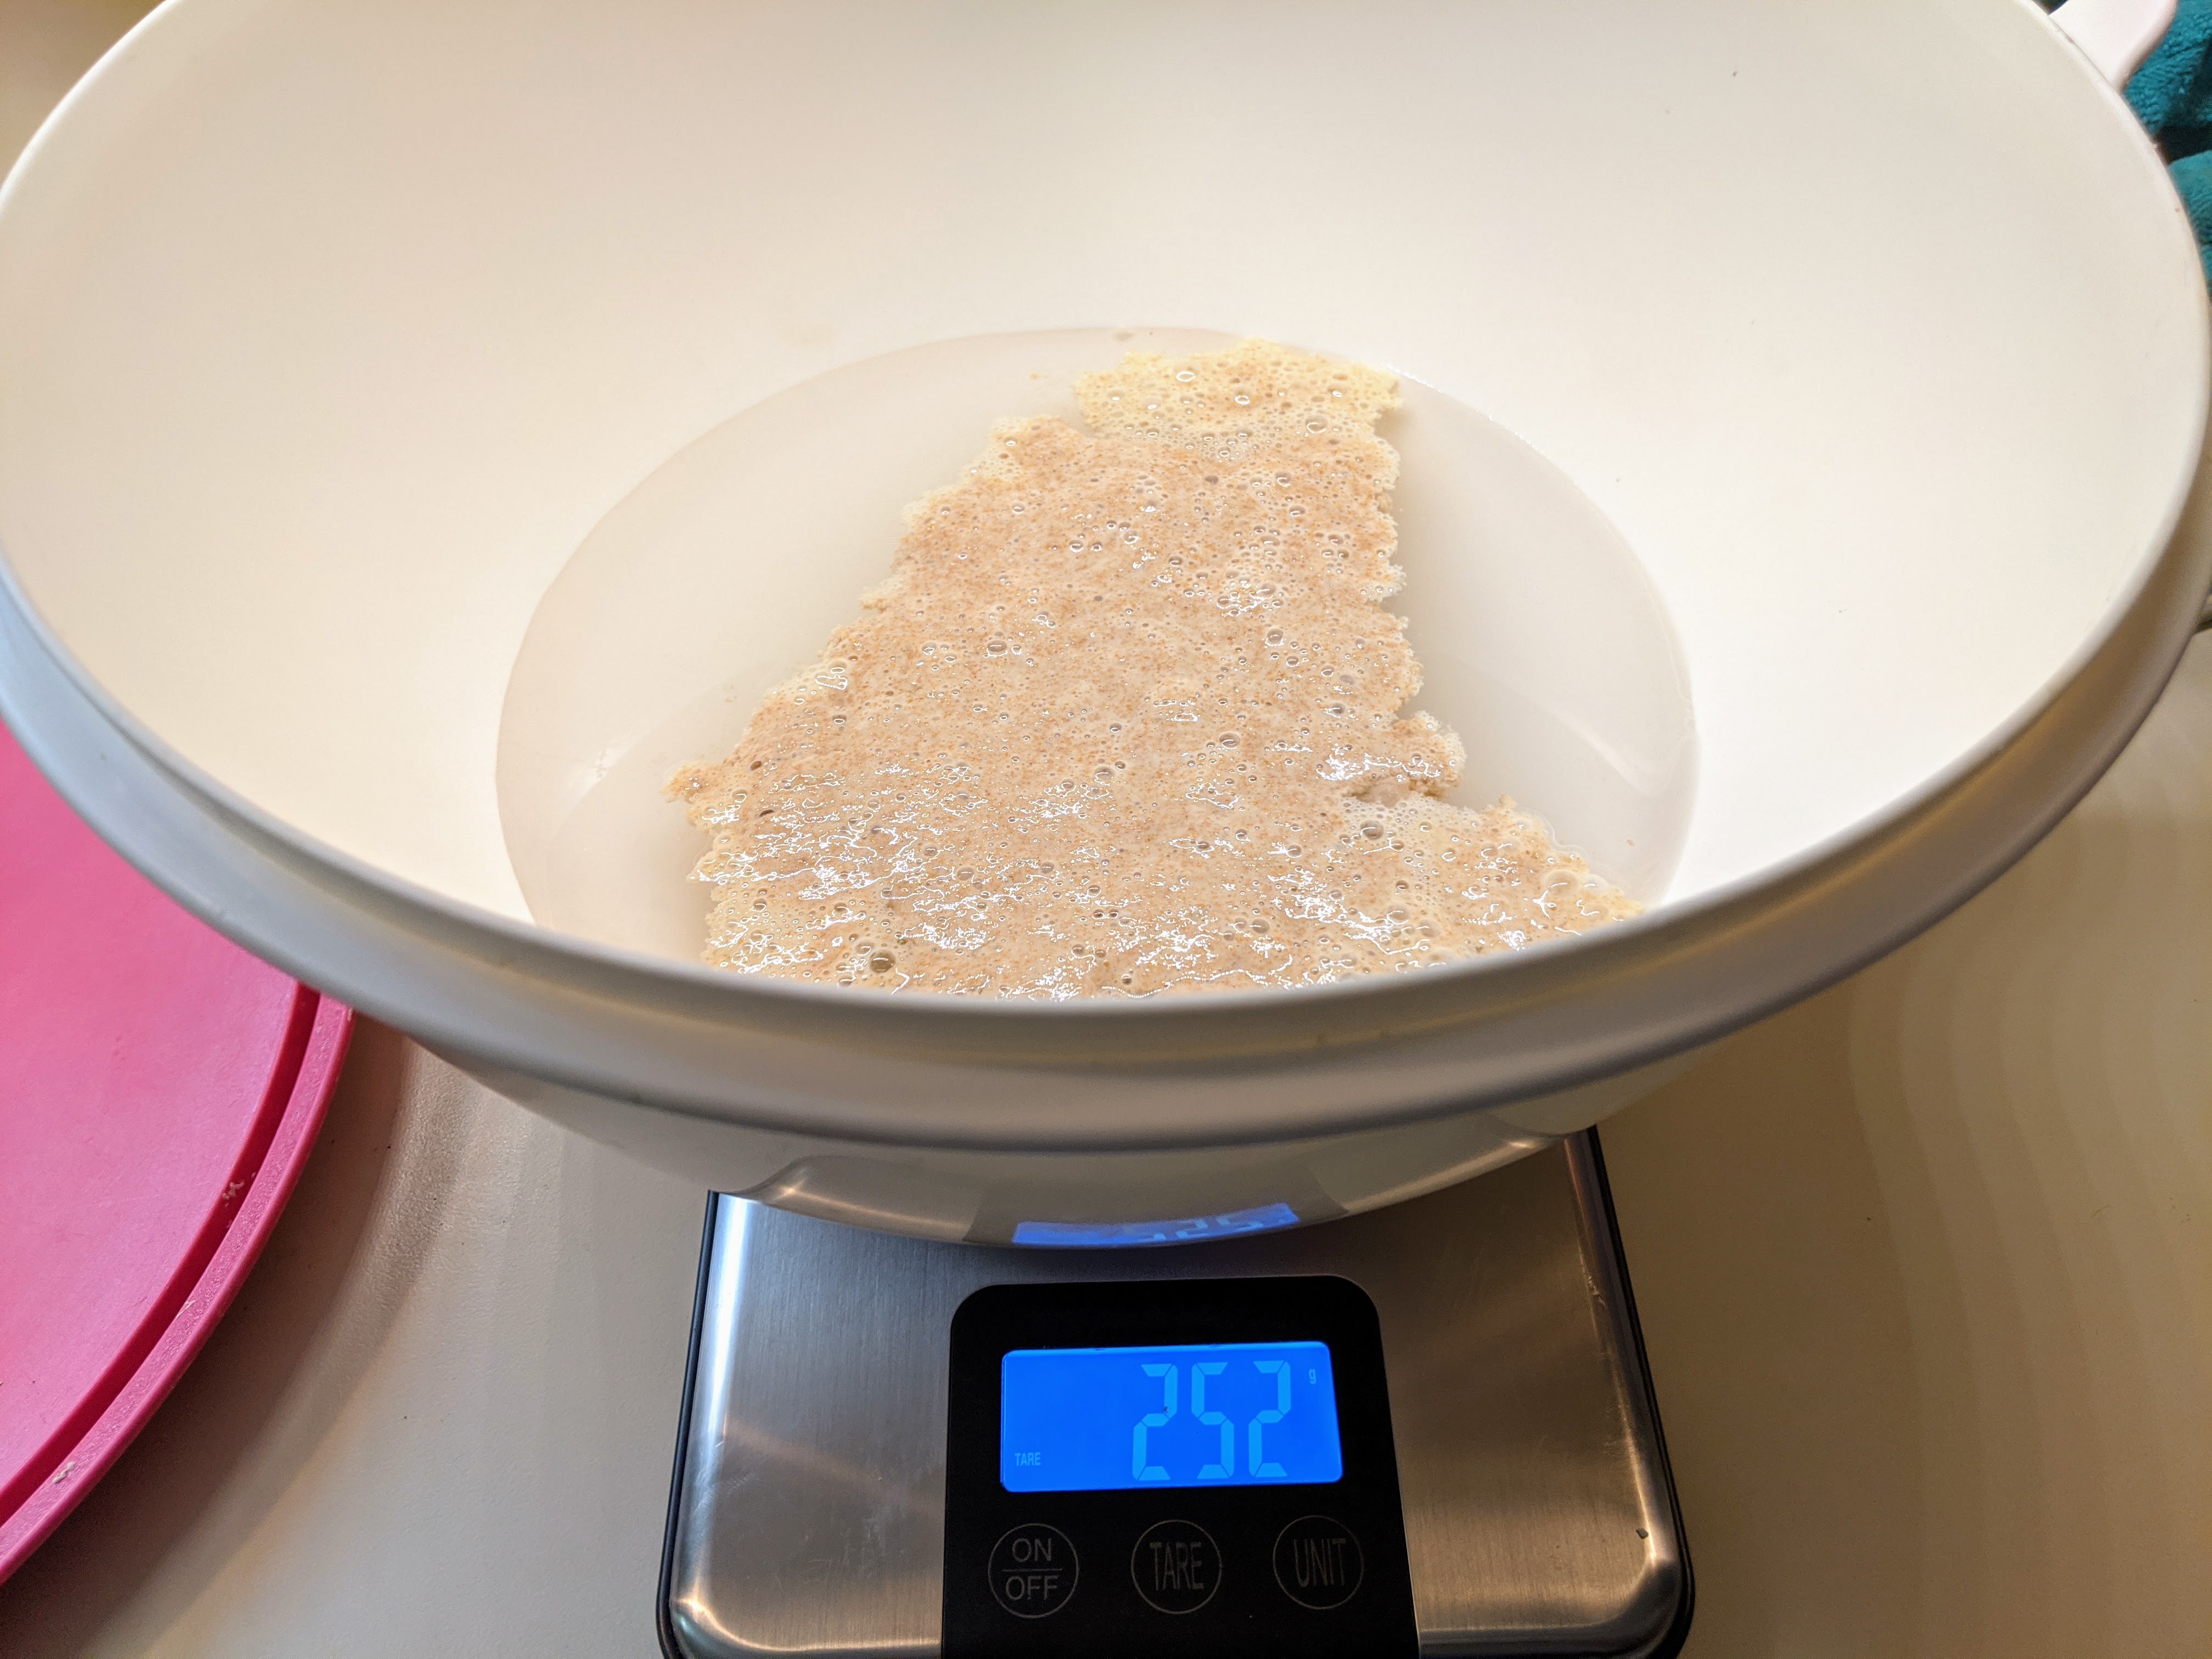
Feed your starter as normal (30 grams of “old starter”, 90 grams of filtered water, 90 grams of whole wheat flour). Mark the level of your starter with a rubber band.
Put your starter in a warm place for 3-5 hours. When it has started to rise but is not at its highest point (you should know this as you’ve been watching it for 5 days) screw the lid down tight and pop it in the fridge.
7 days later (or earlier if you are getting ready to use it) pull the starter out of the fridge and back into your warm place. In 3-4 hours, it should start to grow again. If you are not going to be cooking today, follow the regular procedure for feeding (feed, let it get started growing, screw down the lid and pop it in the fridge.
BUT…
If you are ready to bake some bread you need to dramatically beef up your starter. My standard bread recipe calls for 270 grams of starter. Our starter is 210 grams (30+90+90 grams). Here’s my process to increase the starter AND feed the “mother” to go back into the fridge for next week
You will need:
1 pint jar with lid
1 quart jar with lid
Your trusty chopstick
Filtered water and Whole Wheat Flour
Your “mother” starter
2 rubber bands
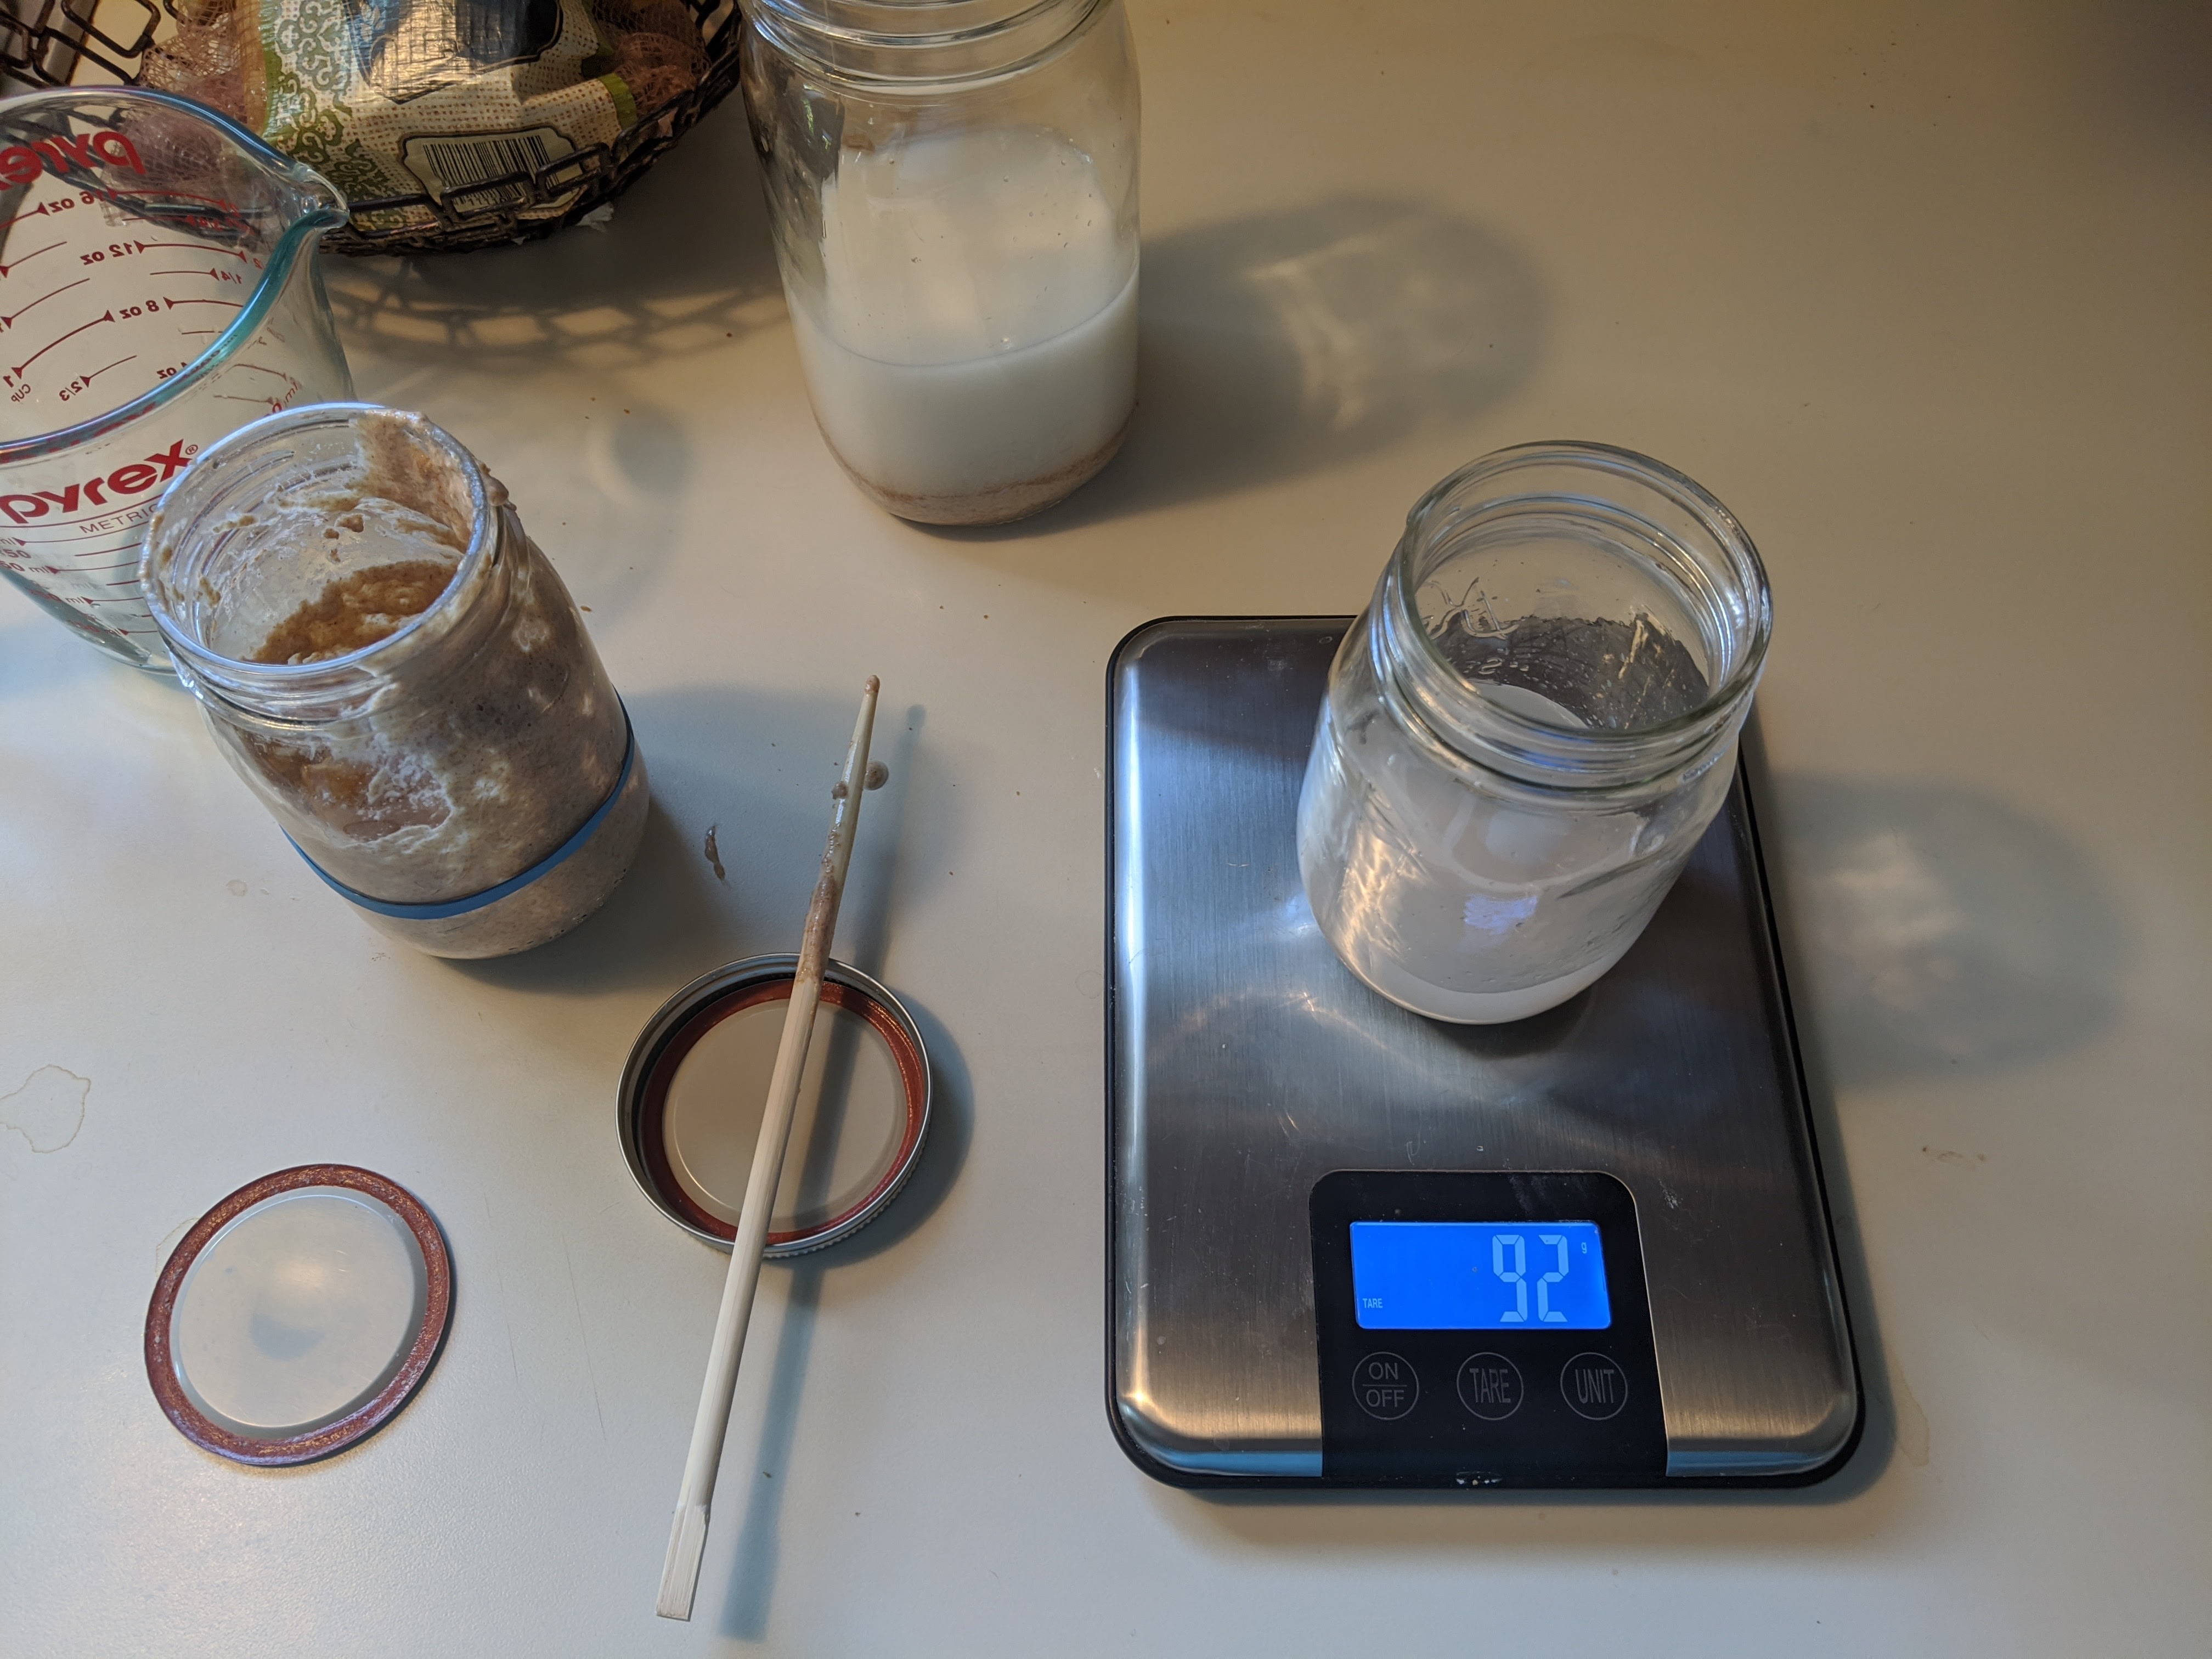
Part One – feed the mother:
Take your mother out of the fridge and let it sit in a warm dry space for a couple of hours, until its warm and starts to rise again.
Put 30 grams of starter in the clean pint jar, and feed, let it start to grow and then pop it into the fridge for next week.
Part 2 – Increase your “working” starter:
Put 70 grams of starter (or more if you wish, it doesn’t really matter as long as you end up with more starter than you need for your recipe) in your quart jar, and add 140 grams of Filtered Water and 140 grams of Whole Wheat Flour, mix, mark with your rubber band, and set in a warm place. This will give you a total of 350 grams of starter, more than enough to bake 2 loaves of bread.
Wait. It is going to take 4-6 hours for it to get to full size, so plan accordingly. I will usually treat it as a typical starter in that I’ll make it the day before, let it get started rising and pop it in the fridge. The morning that I want to bake, I’ll take it out of the fridge and let it warm up and start to rise. When it’s ALMOST at peak rise, I’ll start the bread.
I have watched 100s of hours of YouTube videos (thanks, pandemic) and visited dozens of websites to put my bread recipe together. You may find something else you like, but this is mine. This is almost entirely following the formula on this site: https://bread-magazine.com/sourdough-bread-recipe/ Jarkko Laine has quite a bit to say on the topic of bread, so I recommend you visit his page(s).
He offers a SourdoughU online class (that I didn’t take), but he’s a very prolific YouTuber and has tons of videos about Sourdough and everything else cooking. My timings for my bake come from his Sourdough Baking Guides, available for free download here: Sourdoughu Baking Guides
I also like https://www.bakewithjack.co.uk/ He is also primarily a YouTuber and teacher based in the UK. He has a bunch of troubleshooting videos if you run into a problem
Anyway, here’s how I bake Bread:
I use “bakers math” to bake my loaves. My standard 1 kilo recipe makes 2 loaves in my large oval bannetons and with the big Dutch oven. I modify that standard recipe to a 800 gram recipe for my smaller oval bannetons and double Dutch oven. I also divide the below recipe when I wish to bake 1 loaf of bread.
*Note on the salt. I like a slightly saltier taste to my bread, so I typically use 25g salt.
I will assume you have followed my directions on beefing up your starter and are ready to go.
You will also need
A very large mixing bowl
A plastic bowl scraper
A digital scale
2 bannetons, lightly floured. ( I follow the suggestion from several sites to use rice flour as it won’t produce any gluten as it interacts with your loaf and therefore won’t stick the loaf to the banneton, but you can use regular flour as well).
A large Dutch oven
A razor / lame or very sharp knife. I bought a lame as I wasn’t terribly comfortable holding a razor blade in my bare hand.
Your trusty chopstick
Time (LOTS of time, but it’s mostly just waiting)
Trying to get fancy with the cuts…
MIXING THE DOUGH
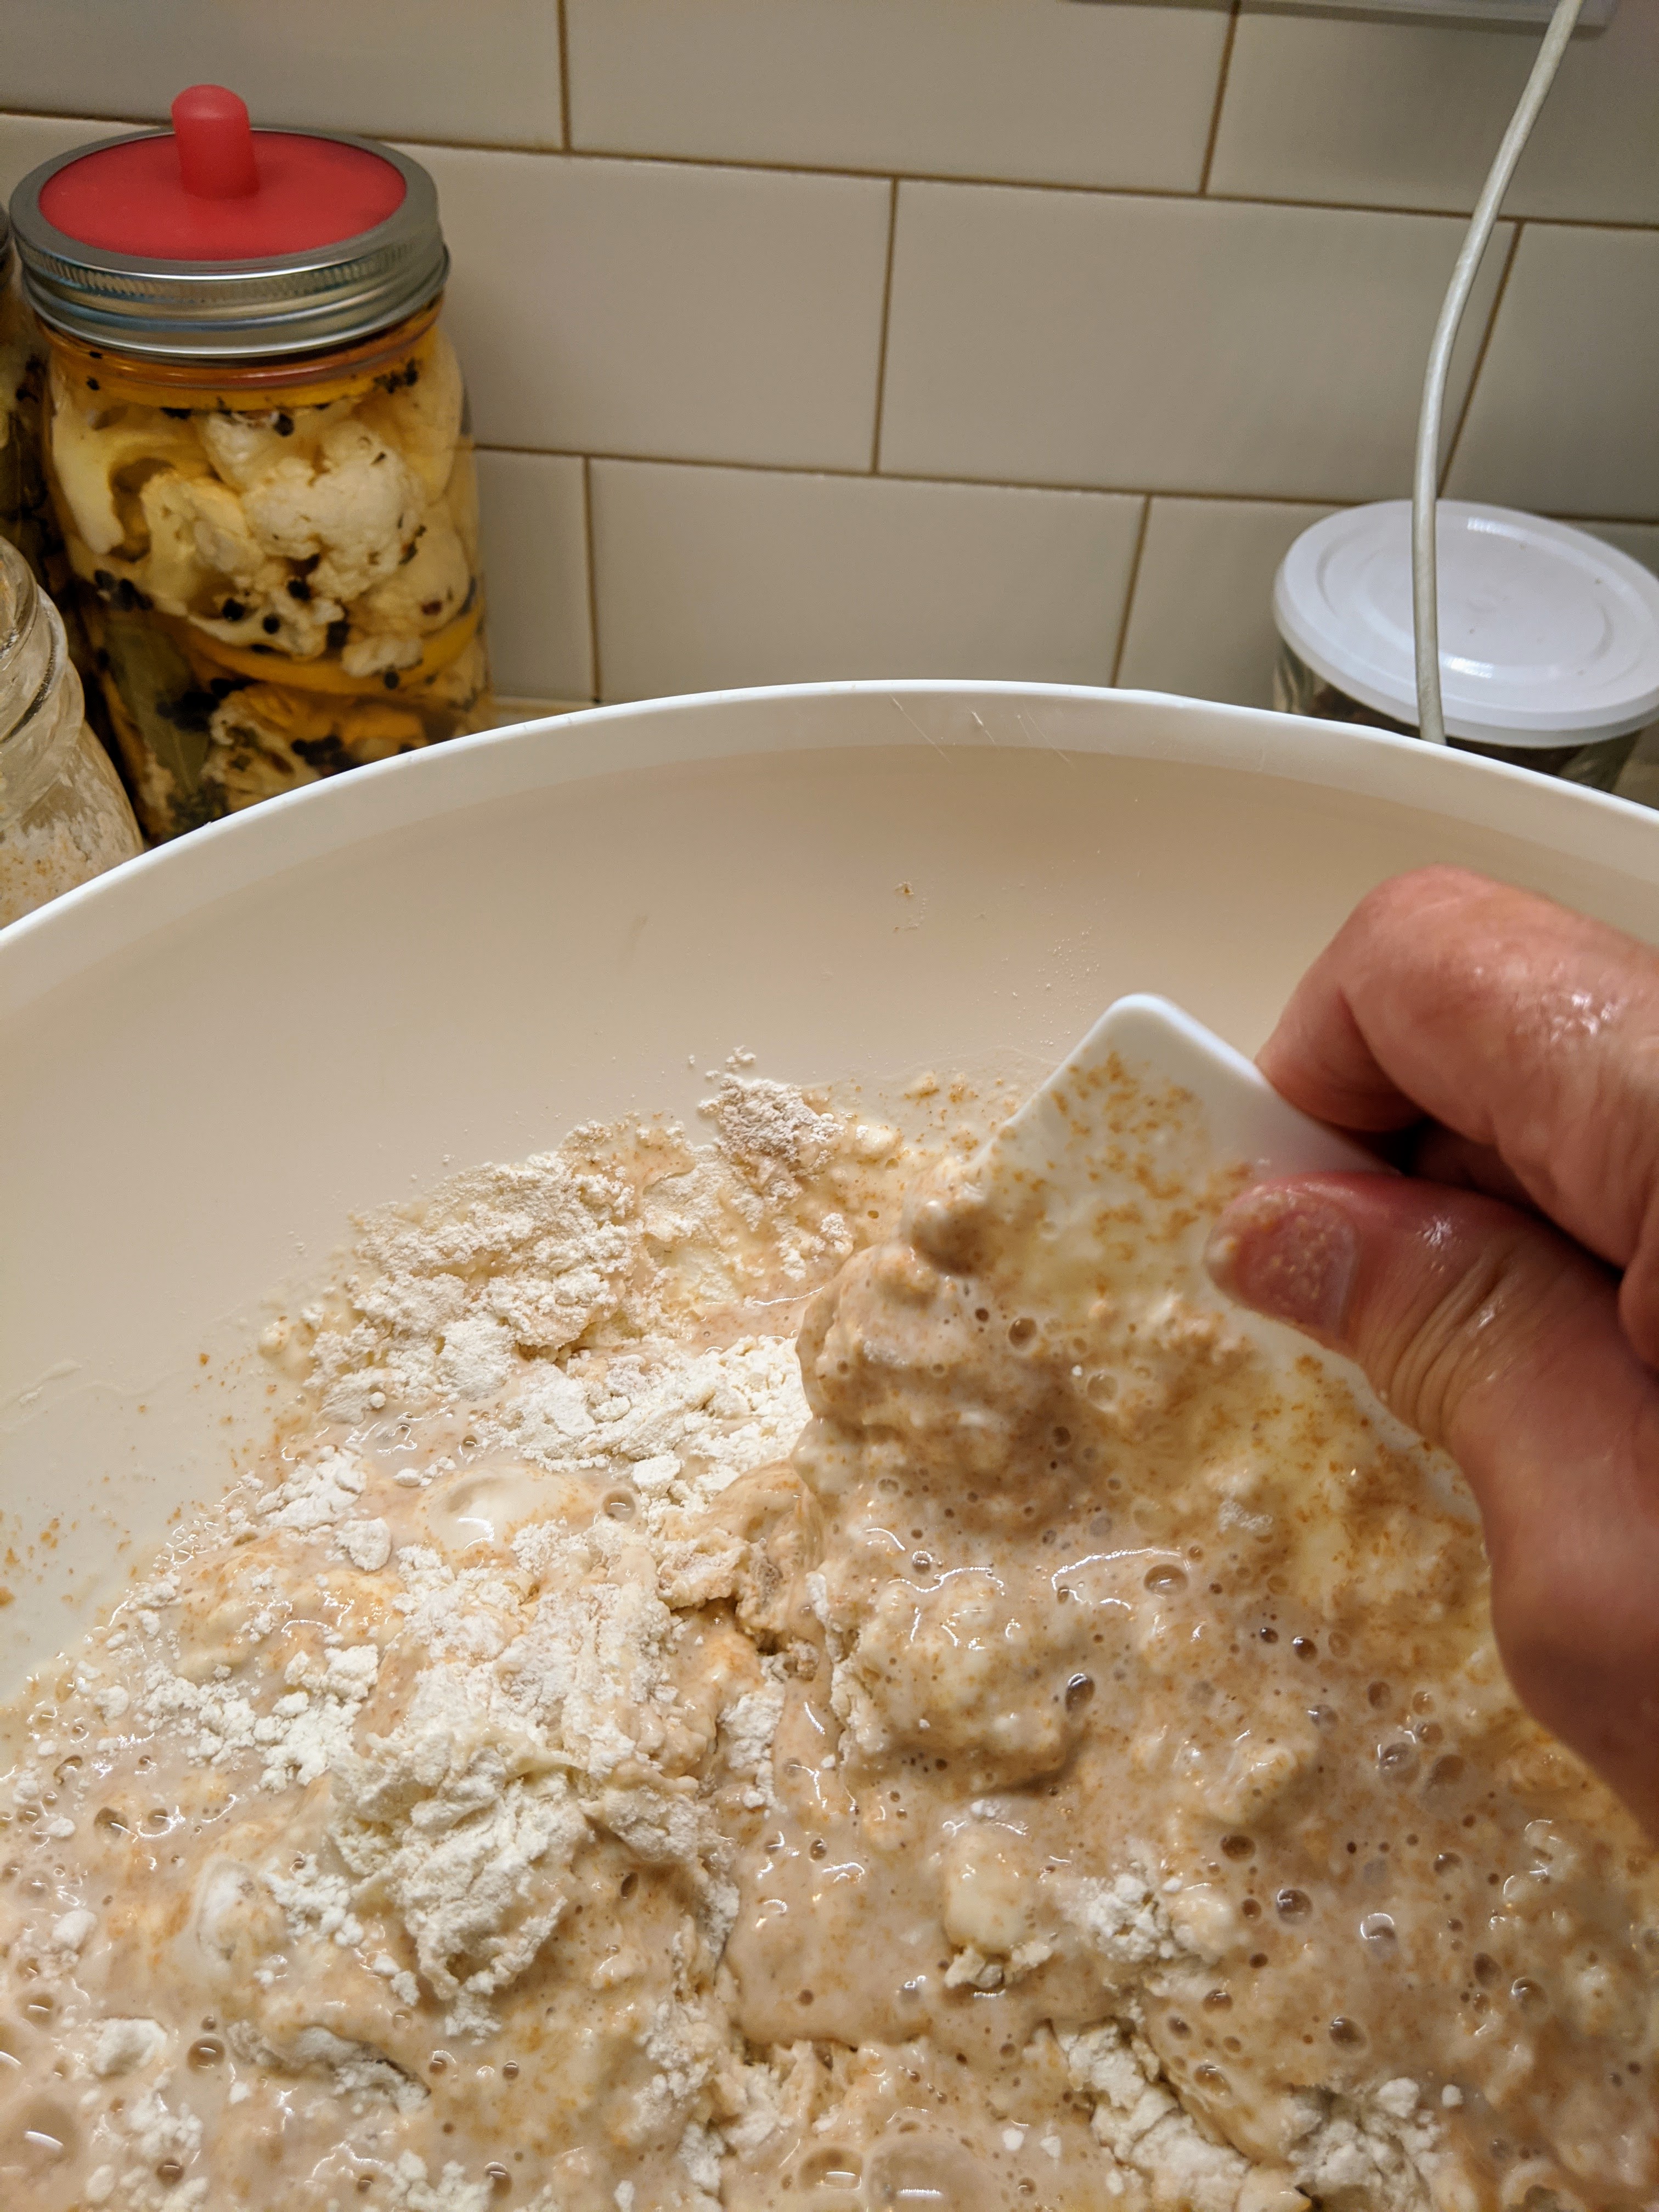
Mix your starter with your water in your mixing bowl and use your scraper to “chop up” the starter to combine it with the water. You do not need to completely dissolve your starter, but this makes it easier to combine with the flour.
Add your AP and Whole Wheat flour.
Using your scraper in a folding motion, combine the flour and water until you get a shaggy dough. This will look a little rough, but that is fine. Just ensure that there are no pockets of flour or no areas that are a lot more hydrated than others. A lot of people do this by hand, but I find that the scraper keeps more dough in the bowl rather than my hand. A very handy trick is to dampen your scraper and hand with water. Use the chopstick to scrape the dough off of the scraper and your hands.
Let the dough rest covered with a tea towel or with the lid of your mixing bowl. This step is called Autolyse and makes the dough MUCH easier to work with. Some bakers say you should let the dough rest for 30 minutes, some 1 hour. I’ve let this go for up to 2 hours without issue, but usually autolyze for 1 hour.
Add the salt in 2 batches, by stretching and folding the dough with your scraper. Dampen your scraper and slide it under the dough, lift, stretch and fold that “corner” over the dough. Turn your bowl ¼ turn and do it again, turn ¼ and repeat until you do not feel any of the granularity of the salt. This will take several stretch and fold turns, but this is the most work you will have to do. Cover and let rest.
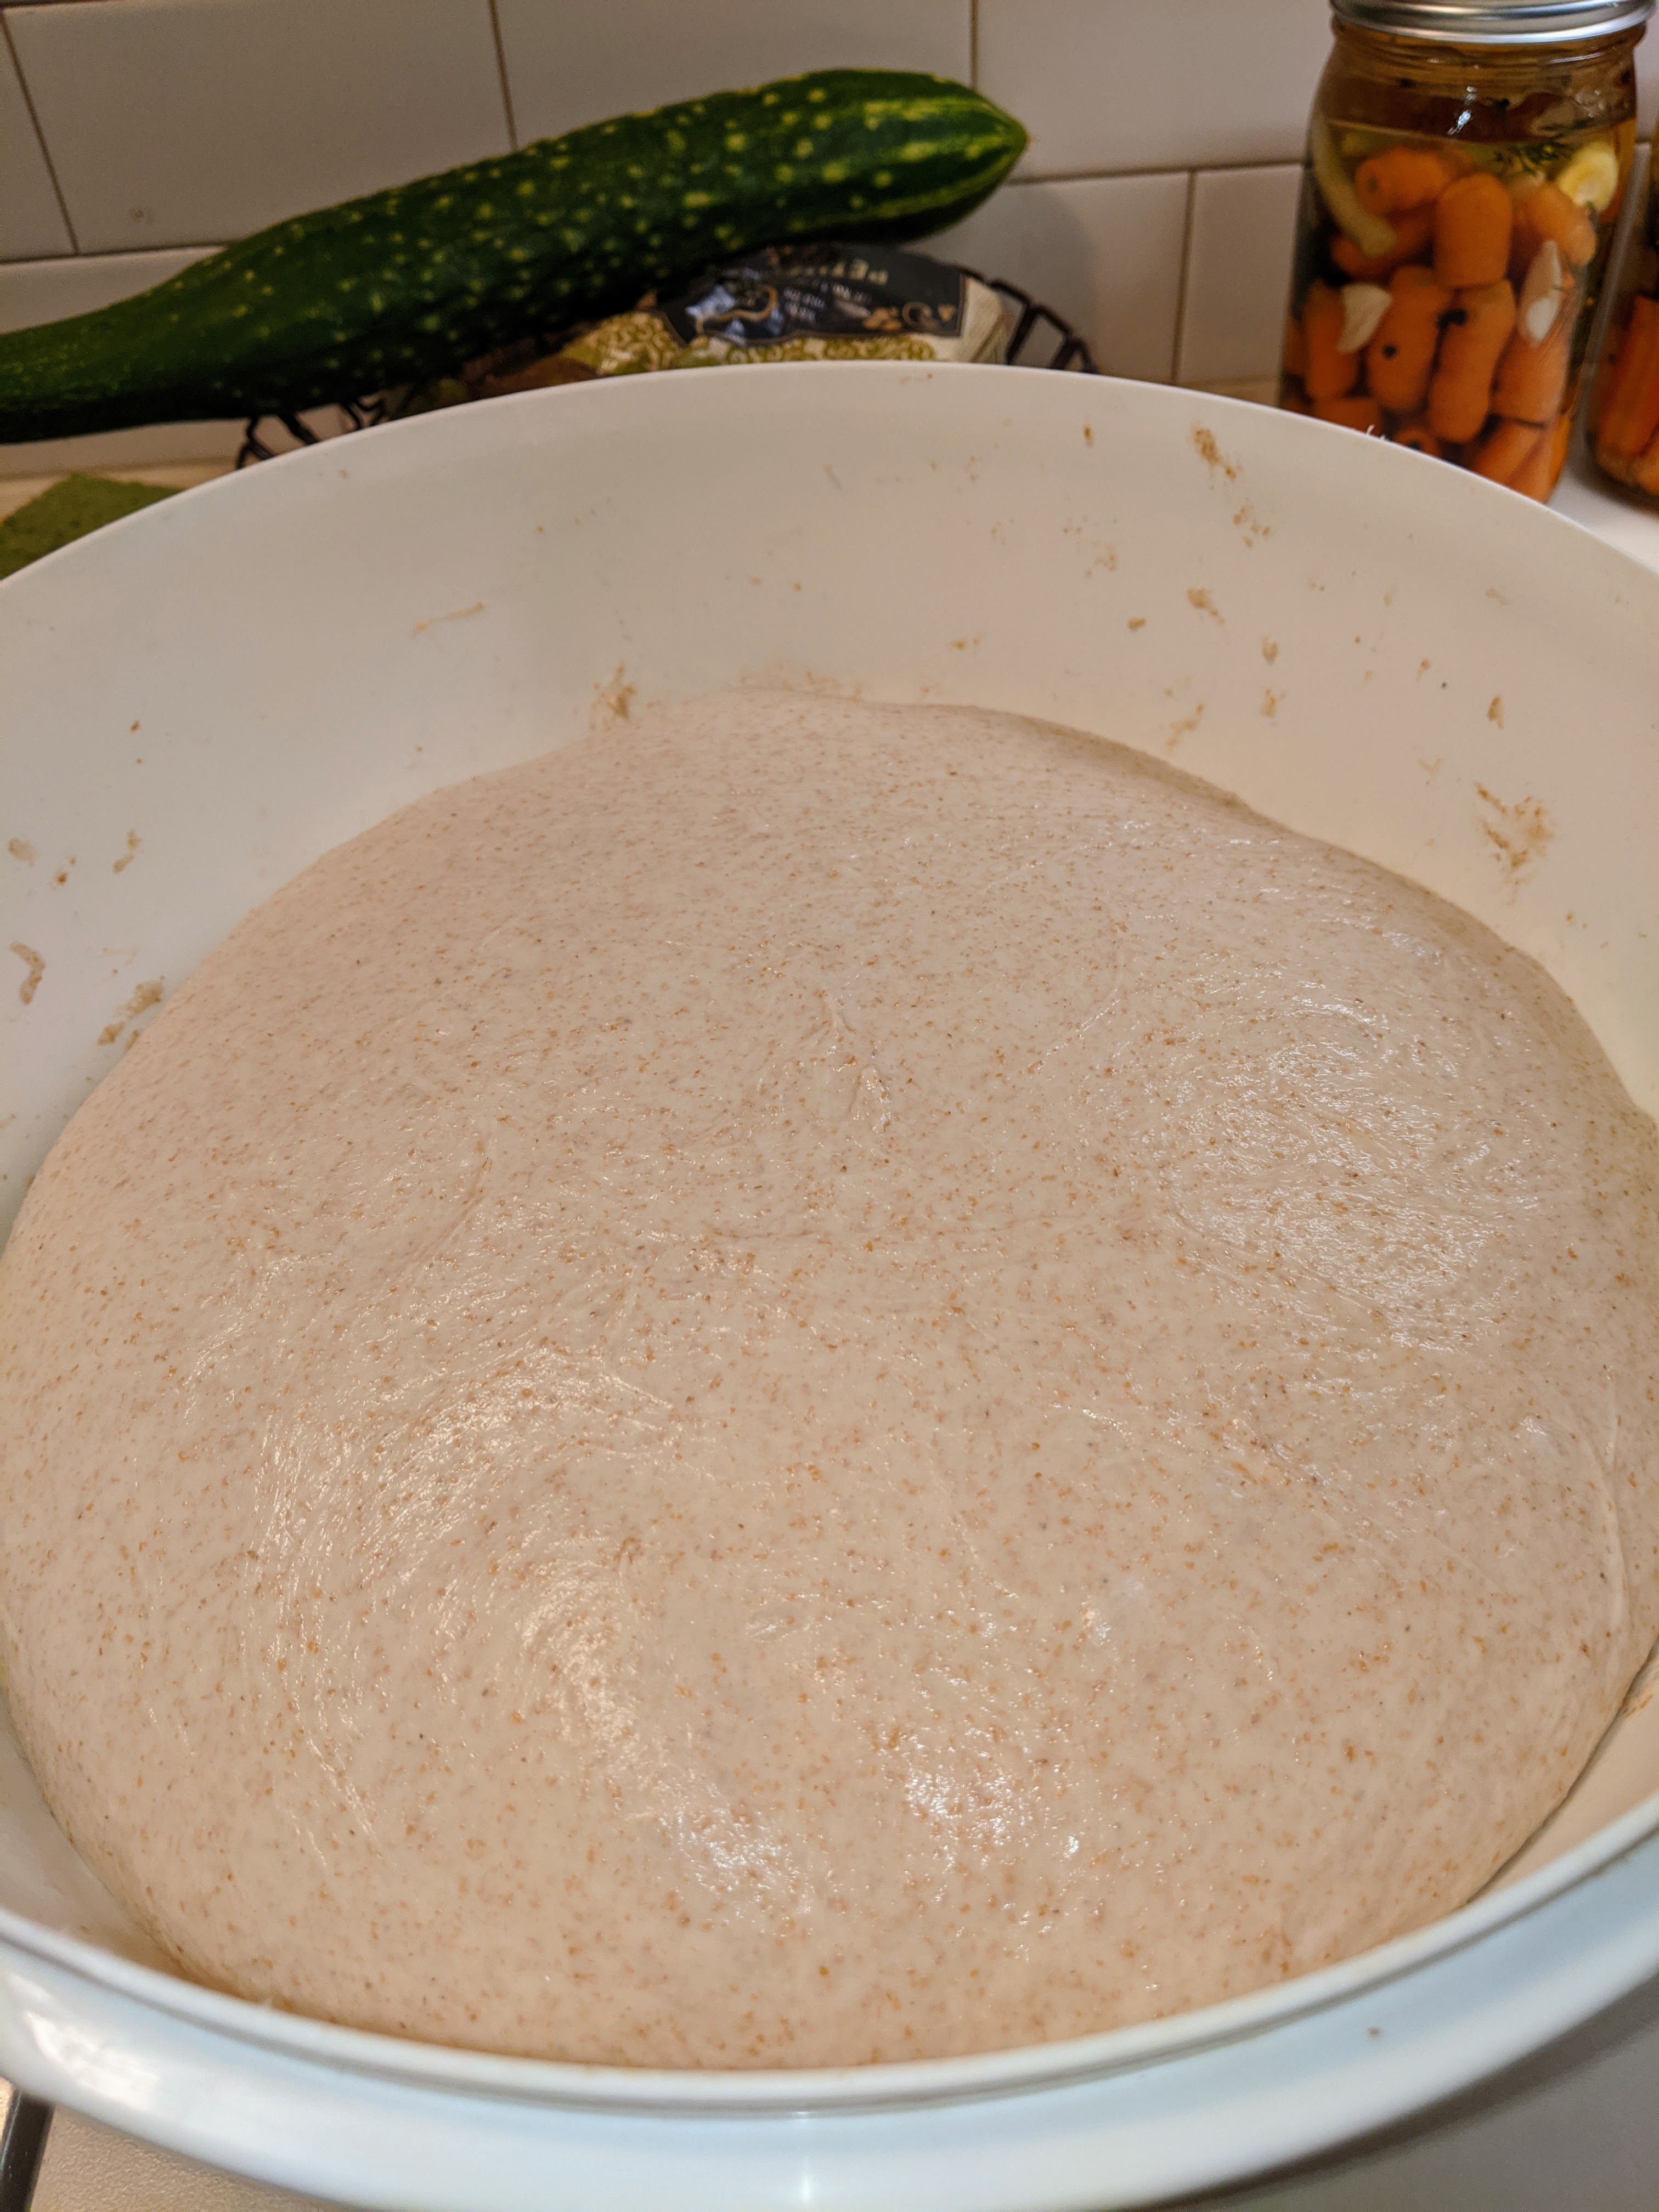
Stretch and fold and bulk fermentation.
Over the next 2-3 hours you are going to stretch and fold the dough to build the gluten. Gluten is required to trap the gas inside the bread so that it will rise. You can do this by kneading the bread over a period of 15 minutes all at once, but that is too much work. Some folks say to pull the bread out of the bowl and do it on a damp counter or a floured surface, but I do it in the bowl. I use my hands for this instead of the scraper because it provides more control.
Dampen your hands and slide it under 1 “corner” of the dough. Lift and stretch it HIGH and fold over the dough, repeat 3 times until you have stretched and folded all 4 “corners. I generally have to use both hands by the time I’ve gotten through the 4th “corner” as the dough is no longer sticking to the bowl to provide a good stretch. Cover and let rest. Recipes call for rests of 30 minutes to 1 hour between folds, I generally fold ever 30 minutes for 2 ½ or 3 hours, so 5 or 6 fold periods.
After completing the last fold, you are going to cover the dough and let it rest. (This is an update) for a MINIMUM of 4 hours to let the starter do its work and grow. I have sometimes let my bread go for as long as 9 hours before shaping. I have NEVER had my bread double in size (but it’s gotten close), so the amount of growth is not a good indicator of when your dough is ready for the next step. You just have to keep an eye on it, and when it looks like it has grown a fair bet dampen your finger and poke the dough lightly. If it makes a dimple that then slowly rises back, your dough is done. If it springs back quickly, it needs more time. Try the poke test every 30 minutes or so until the depressed area rises slowly. My favorite description of this is if the depression rises as if it’s “waking from a long nap”
Shaping your loaves
Now you are going to shape your loaves. There are TONS of videos out there about how to do this, but this is how I do it:
Lightly flour your surface. I like to use a pastry mat. It’s easier to clean, and it reminds me of my mom (who always used one exactly like the one I have). I frequently add more flour to the surface while I’m shaping.
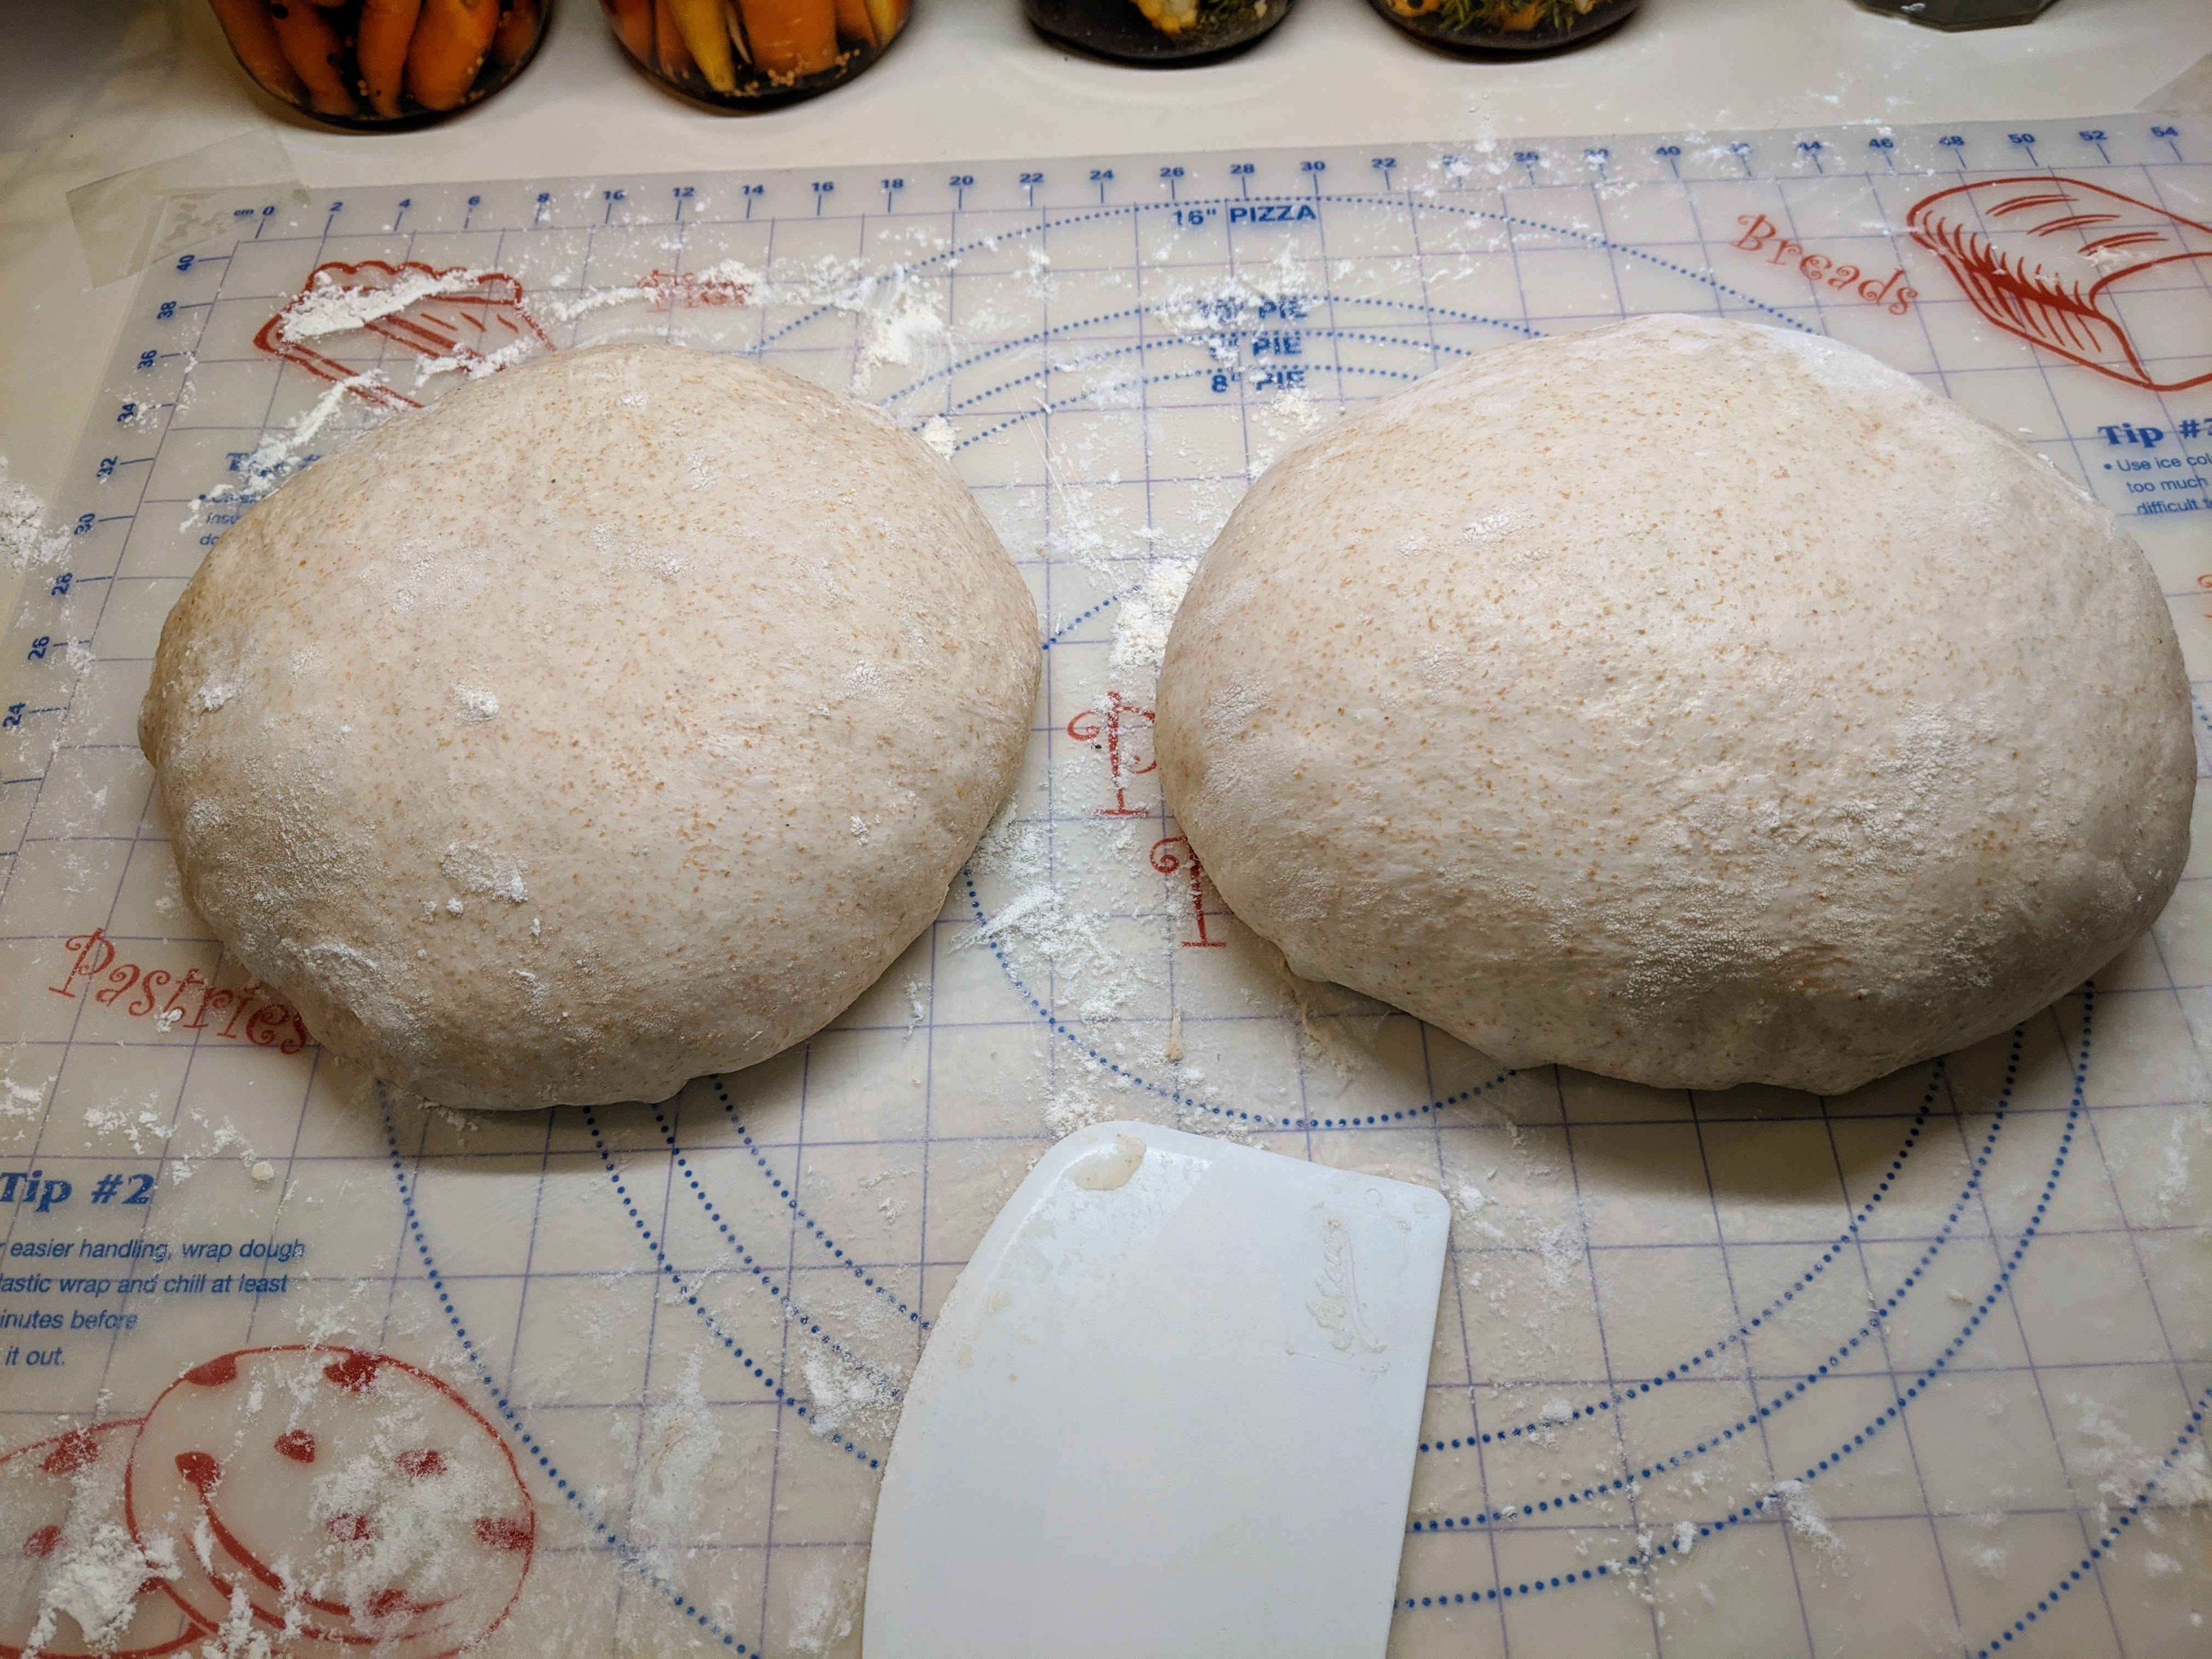
Using your scraper move your dough from the bowl to the surface.
Using your wet scraper cut the dough in 2 even sized pieces gently pulling them away from each other as you cut.
Gently stretch and shape the dough so that it is a rough, fairly narrow (about 5 inches or so wide, about 9-10 inches long). Ensuring that you have enough flour below your loaf and flour on your hands, pick up the top right corner of your loaf, stretch it a little bit and fold it about 1 inch or so towards the center of your loaf, sticking it down lightly. Repeat with the top left corner. Move about ½ inch down and repeat on both the right and the left. Repeat until you have about 1 inch at the bottom of the loaf. Pull that bottom inch gently toward you and fold it toward the middle. Now roll the bottom gently towards the top. It should all stick together and now you have a lightly flowered, slightly oblong loaf. Flowering your hands and the surface again, cup the dough and slightly turn it around in a ¼ circular motion on the surface, lightly tucking in towards the bottom as you turn. Continue this until you have a nice tight little ball.
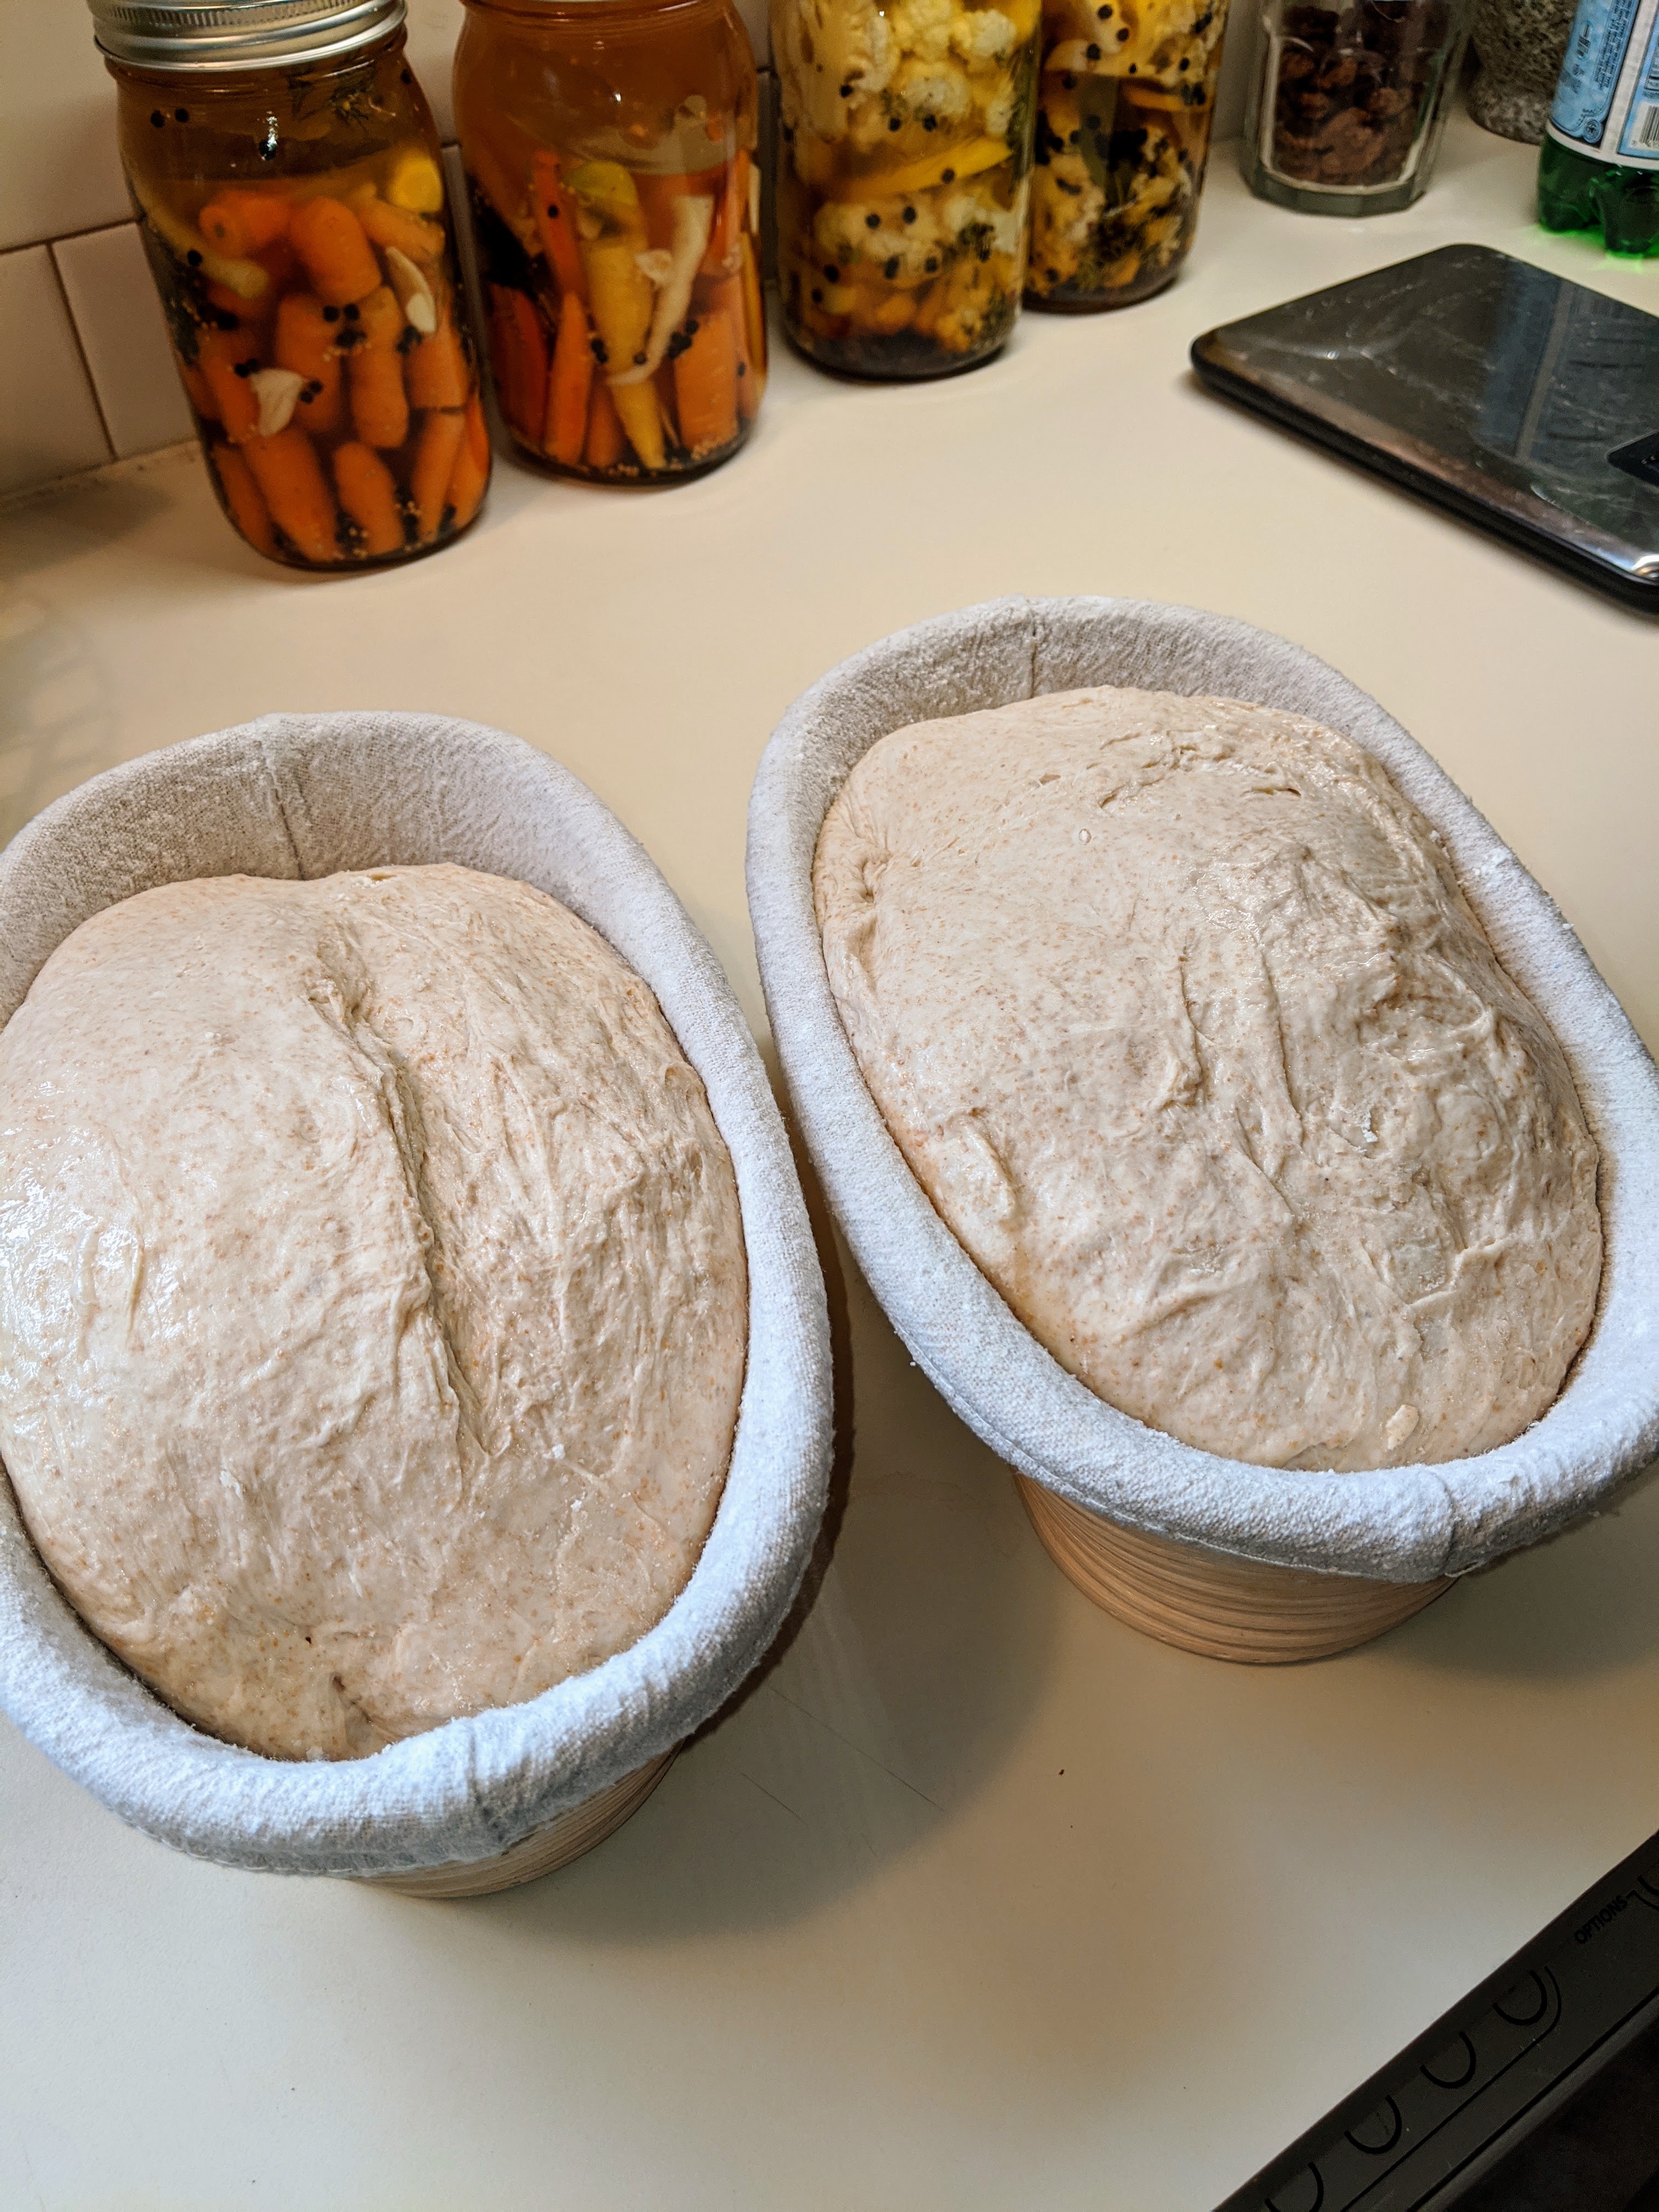
Pick it up and put it in your banneton and cover.
Repeat with 2nd loaf.
Cover with a tea towel or a large plastic bag. I saw a hack to use disposable hair bonnets, and that was a game changer. Up to you.
Place in the fridge overnight. This long rest (the cold stops the fermentation, so it won’t rise much) supposedly really amps up the flavor of the bread).
Bake!
Place your Dutch oven into your oven and preheat both at 446 degrees Fahrenheit (260 Celsius) for at least 30 minutes, but I prefer an hour. You want the Dutch oven screaming hot.
Take your dough out of the fridge, remove the plastic covering, and let warm on the counter while the oven is preheating.
Carefully remove your screaming hot Dutch oven from the oven.
Quickly center and then turn your banneton over the Dutch oven so that the bread plops into the Dutch oven. A lot of people say to turn your bread onto parchment, and the gently lower the parchment into the Dutch oven. My experience is if you have any condensation on the bottom of your loaf (the top of the banneton) that it will fuse with the parchment paper and will be impossible to remove post-bake. Another tip is to sprinkle some semolina flour into the bottom of the Dutch oven to prevent the bottom from overbaking before the top is done. I will frequently do that, but it’s not a requirement by any means.
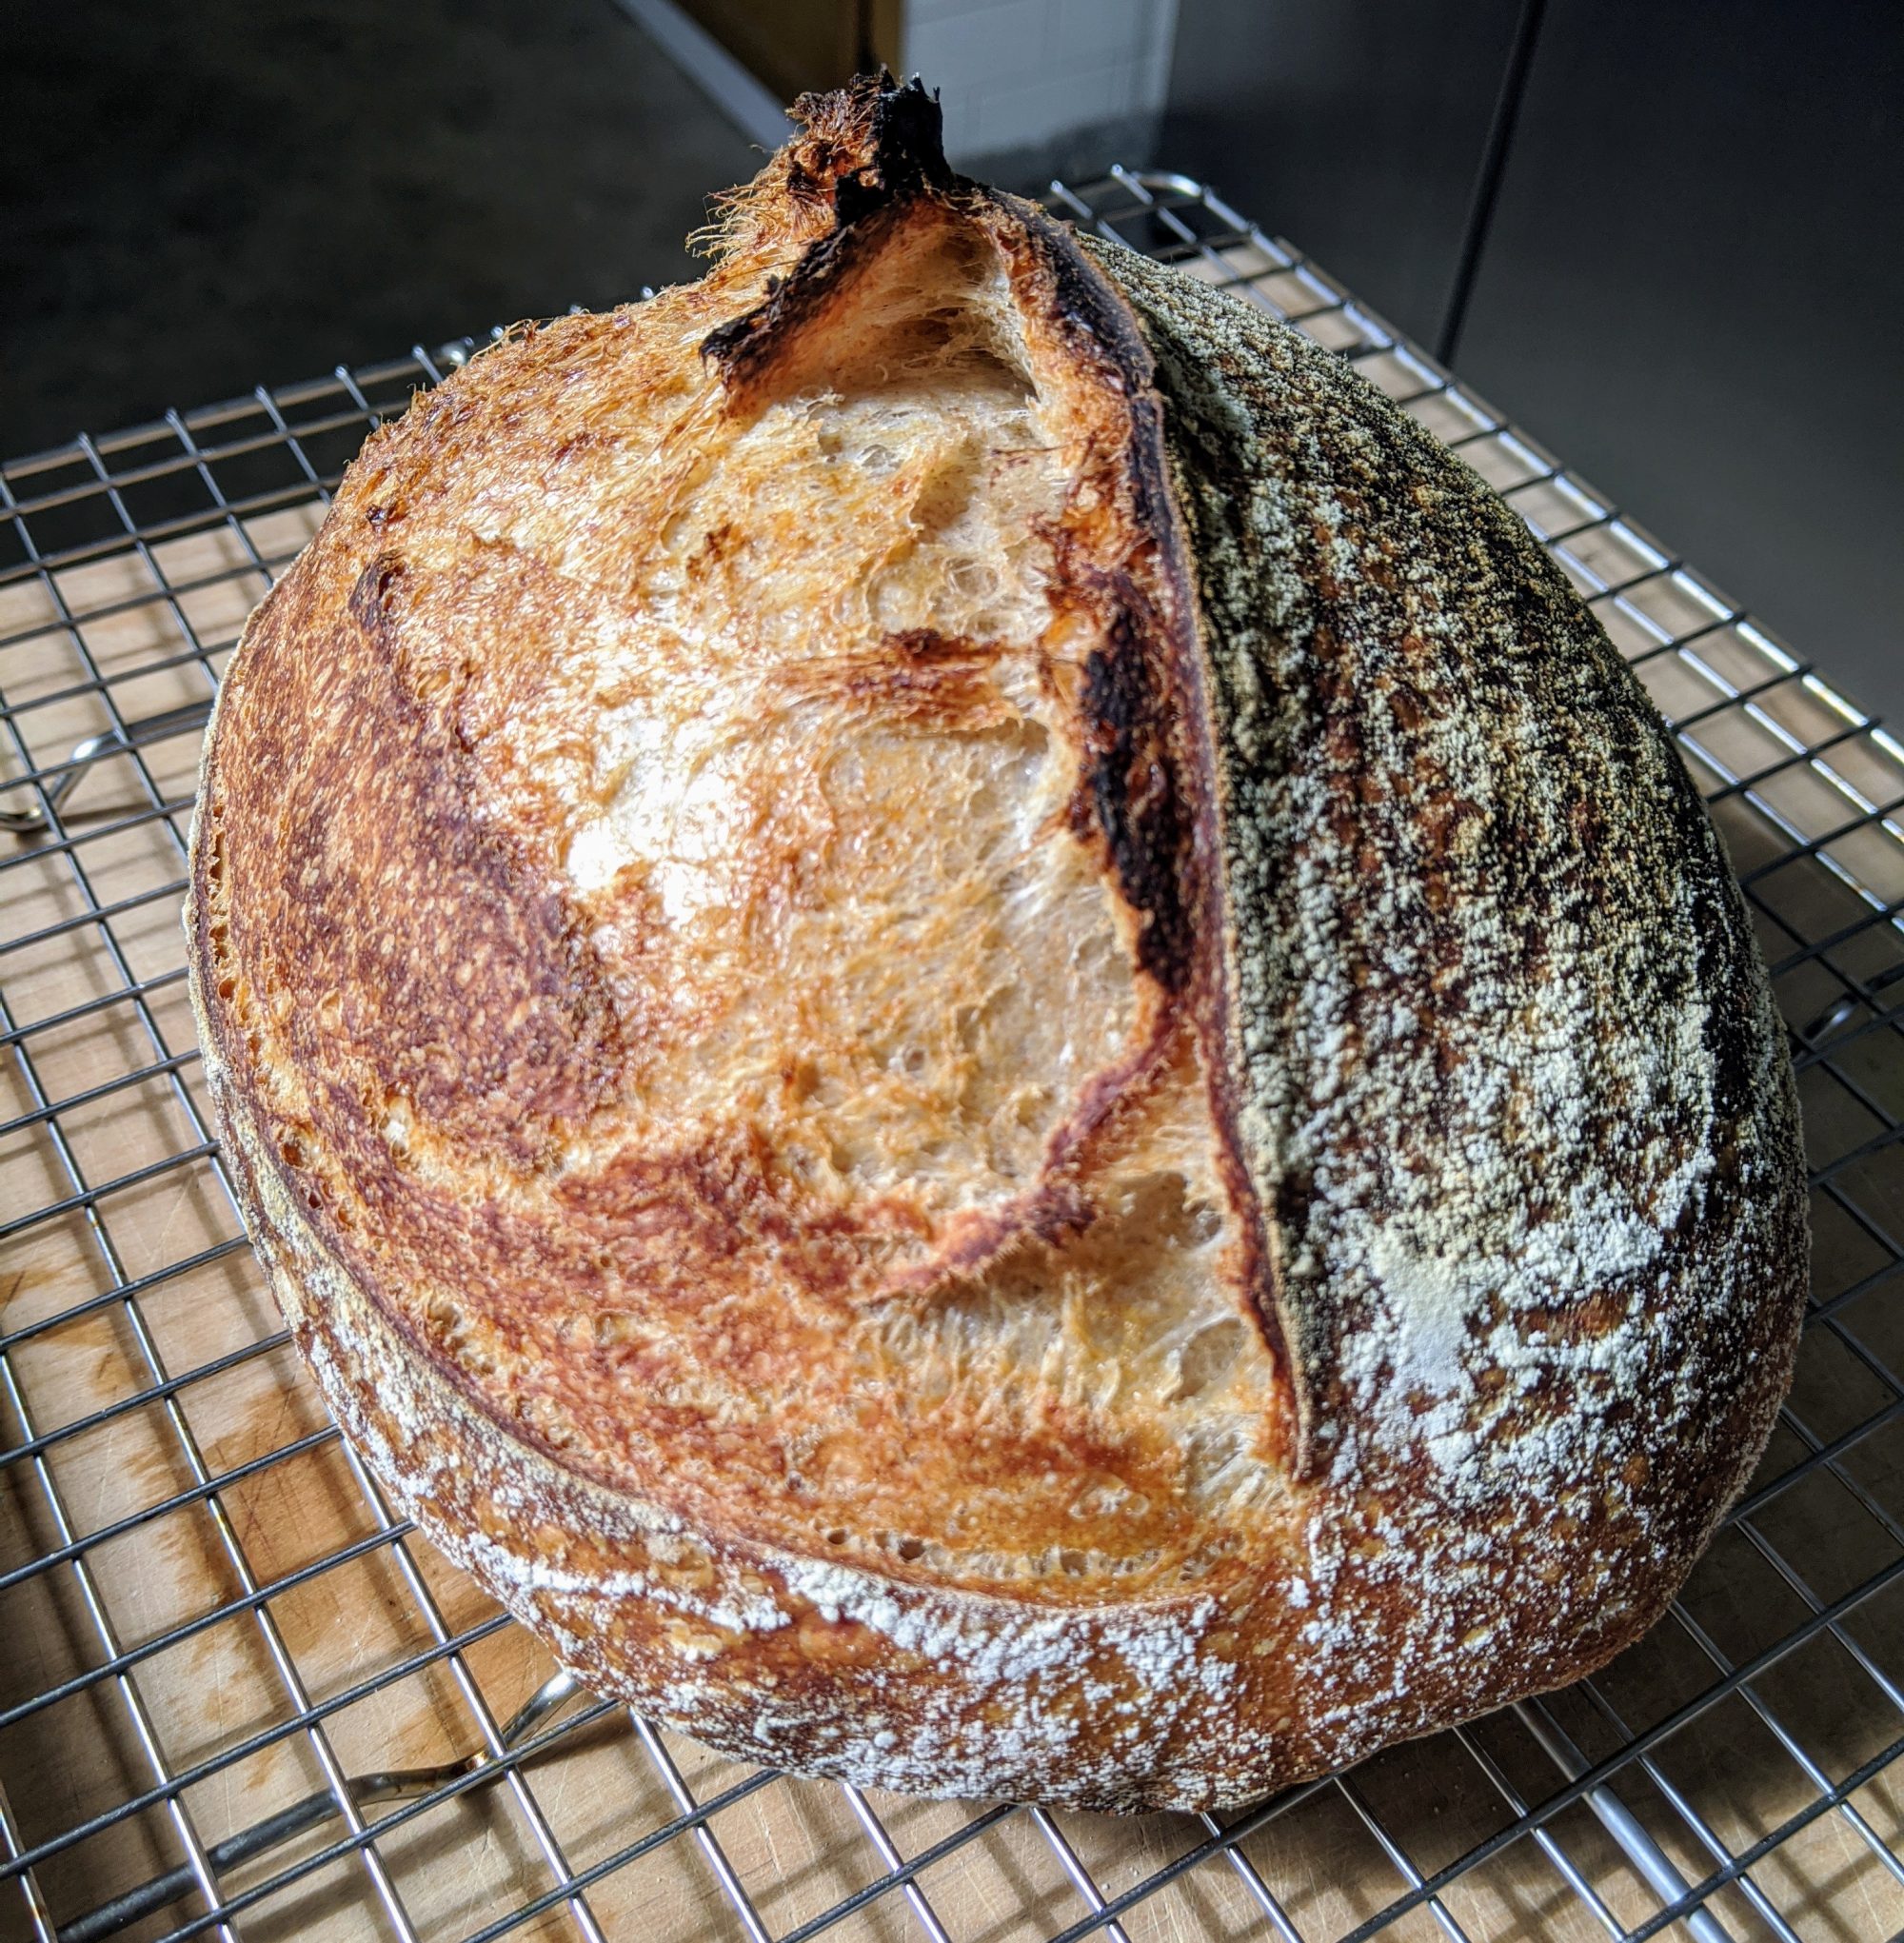
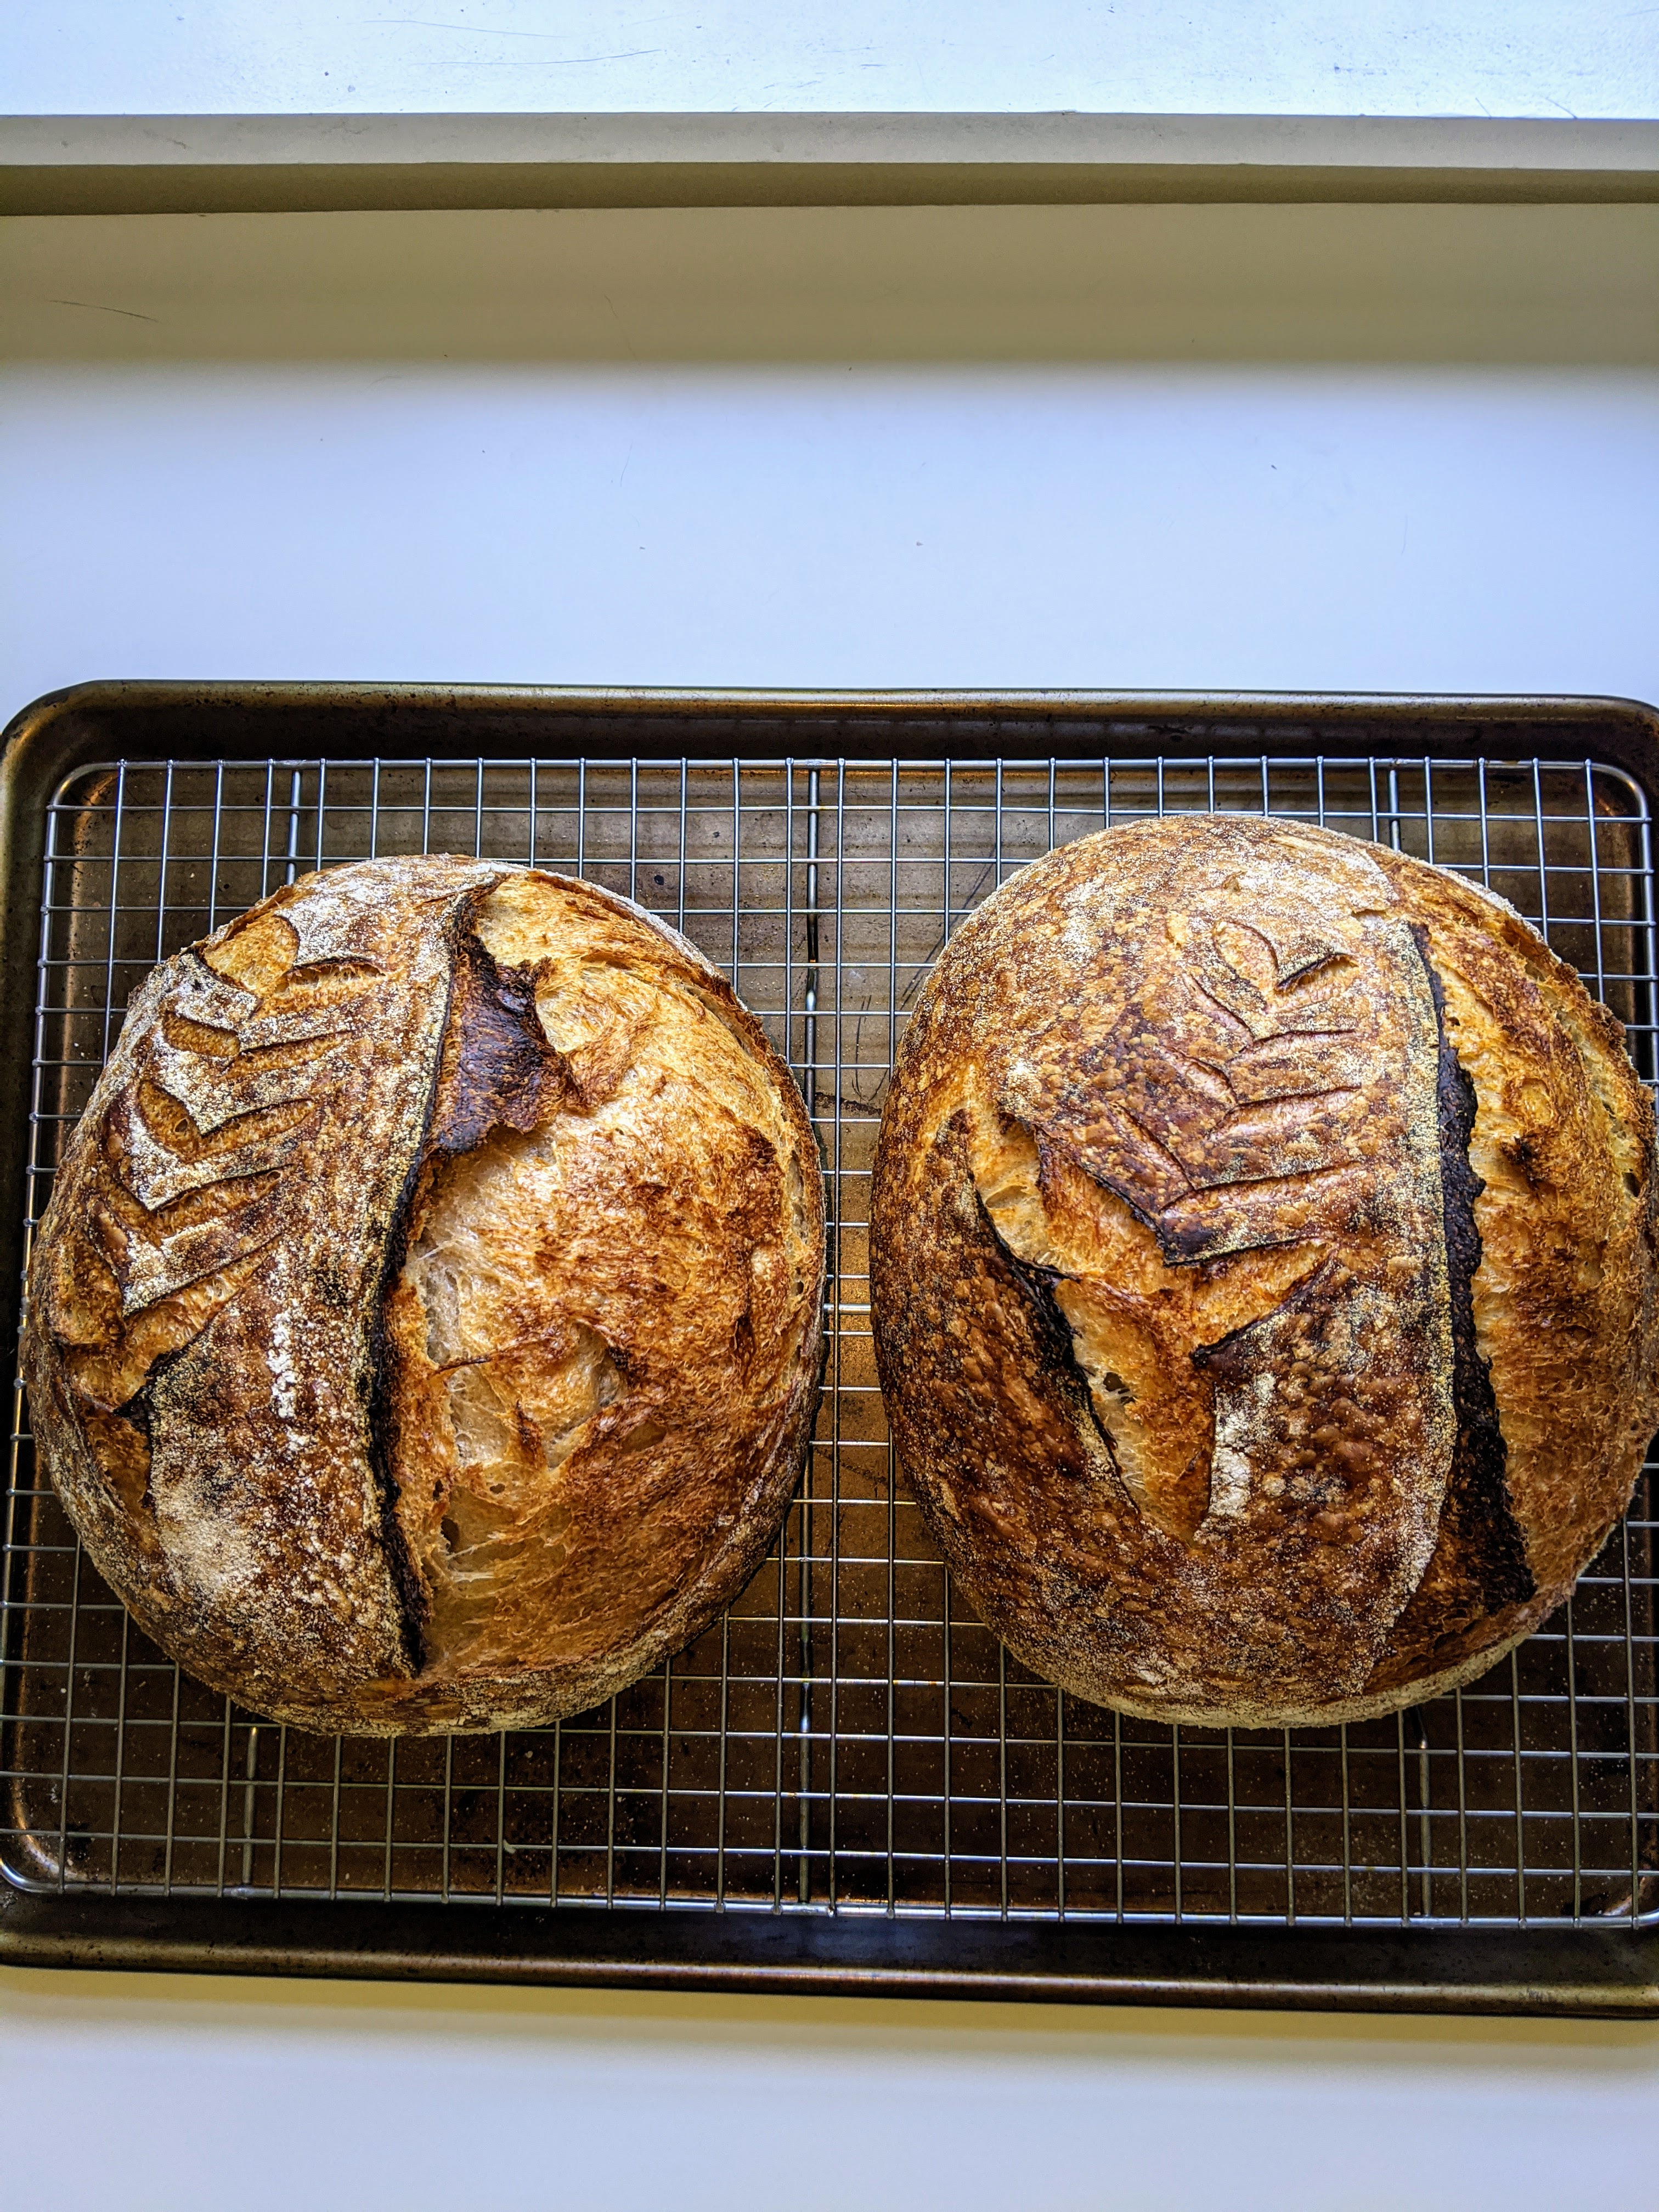
Take your lame or razor and cut the loaf across the top of the bread. There are many ways to do this, some of them quite decorative, but I go for the general long slight curve, like a Mona Lisa smile.
Cover your Dutch oven and place it in the oven and bake for 25 minutes.
After 25 minutes, remove the lid and place the Dutch oven back into the oven for an additional 25 minutes.
1st loaf is done! Remove it from the Dutch oven and put the Dutch oven with the lid on back into the oven for 30 minutes. This will allow the lid to come back up to temperature with the bottom.
Repeat steps 3-7 for loaf 2.
Let loaves cool on a wire rack for at LEAST an hour. If you cut the bread while it’s still warm, all of its moisture will escape as steam, and it will turn into a rock within hours.
To keep my loaves fresh, I wrap them in a clean, dry tea towel and put them back into the Dutch oven with the lid on. My loaves will generally last 4-6 days when kept that way, but if it’s particularly warm, they tend to get a bit moldy after 4 days. If you keep your loaf on the counter or in a paper bag, it will turn into a rock in 2 days. If you keep it in a plastic bag, its sure to mold within 3 days (and be damp). The Dutch oven storage is the best storage I have devised.
So, you have been feeding your starter every day for the last five days. Good for you! But you don’t have to feed it every day. Here’s how I keep my starter.
You will need:
Your starter (called the Mother)
Clean wide-mouth pint jar with a lid
Your trusty chopstick
Filtered water and Whole Wheat Flour
Rubber band
Feed your starter as normal (30 grams of “old starter”, 90 grams of filtered water, 90 grams of whole wheat flour). Mark the level of your starter with a rubber band.
Put your starter in a warm place for 3-5 hours. When it has started to rise but is not at its highest point (you should know this as you’ve been watching it for 5 days) screw the lid down tight and pop it in the fridge.
7 days later (or earlier if you are getting ready to use it) pull the starter out of the fridge and back into your warm place. In 3-4 hours, it should start to grow again. If you are not going to be cooking today, follow the regular procedure for feeding (feed, let it get started growing, screw down the lid and pop it in the fridge.
BUT…
If you are ready to bake some bread you need to dramatically beef up your starter. My standard bread recipe calls for 270 grams of starter. Our starter is 210 grams (30+90+90 grams). Here’s my process to increase the starter AND feed the “mother” to go back into the fridge for next week
You will need:
1 pint jar with lid
1 quart jar with lid
Your trusty chopstick
Filtered water and Whole Wheat Flour
Your “mother” starter
2 rubber bands
Part One – feed the mother:
Take your mother out of the fridge and let it sit in a warm dry space for a couple of hours, until its warm and starts to rise again.
Put 30 grams of starter in the clean pint jar, and feed, let it start to grow and then pop it into the fridge for next week.
Part 2 – Increase your “working” starter:
Put 70 grams of starter (or more if you wish, it doesn’t really matter as long as you end up with more starter than you need for your recipe) in your quart jar, and add 140 grams of Filtered Water and 140 grams of Whole Wheat Flour, mix, mark with your rubber band, and set in a warm place. This will give you a total of 350 grams of starter, more than enough to bake 2 loaves of bread.
Wait. It is going to take 4-6 hours for it to get to full size, so plan accordingly. I will usually treat it as a typical starter in that I’ll make it the day before, let it get started rising and pop it in the fridge. The morning that I want to bake, I’ll take it out of the fridge and let it warm up and start to rise. When it’s ALMOST at peak rise, I’ll start the bread.
Just added my first entry into Sourdough 101. Thought I would start at the beginning, so I wrote up the way that I successfully created my starter in April 2020 using tips and tricks I gleaned from the web. Check it out on the Sourdough 101 page! https://barrybakesbread.com/creating-a-wild-sourdough-starter/
Why create a blog about sourdough? Like so many during the 2020 pandemic, I had a lot of time on my hands, an interest in bread baking and a lack of yeast available. I went on line, watched a ton of videos, visited hundreds of websites, tried and failed a couple of times to get a starter going, and finally cobbled together what worked best for me. Since that time in early April 2020, I have shared many “babies” from my mother starter with friends, and written many emails to explain my process. Rather than continue to share my journey piecemeal, I decided to create a single repository for my accumulated wisdom (and lack thereof). I am not an expert baker, or trained chef. I’m just a guy with a love of good food, with a fair amount of time on my hands, and a willingness to share what I have found useful. I will be sharing many sites where I have found the best info and recipes. I’ll provide links to many videos I found educational, entertaining, or just fun. I’ll also include equipment suggestions and reviews. I hope to help you find the best way to incorporate home baking, fermenting, and cooking into your life.